The playground
A tour of the playground
One window: the workbench down the left, the flight on the right, and a bar across the top that runs both.
The playground is a single screen. Everything you build lives in the workbench on the left, everything that flies is drawn on the right, and nothing opens a new page. This is where each part is, what it does, and which key reaches it.
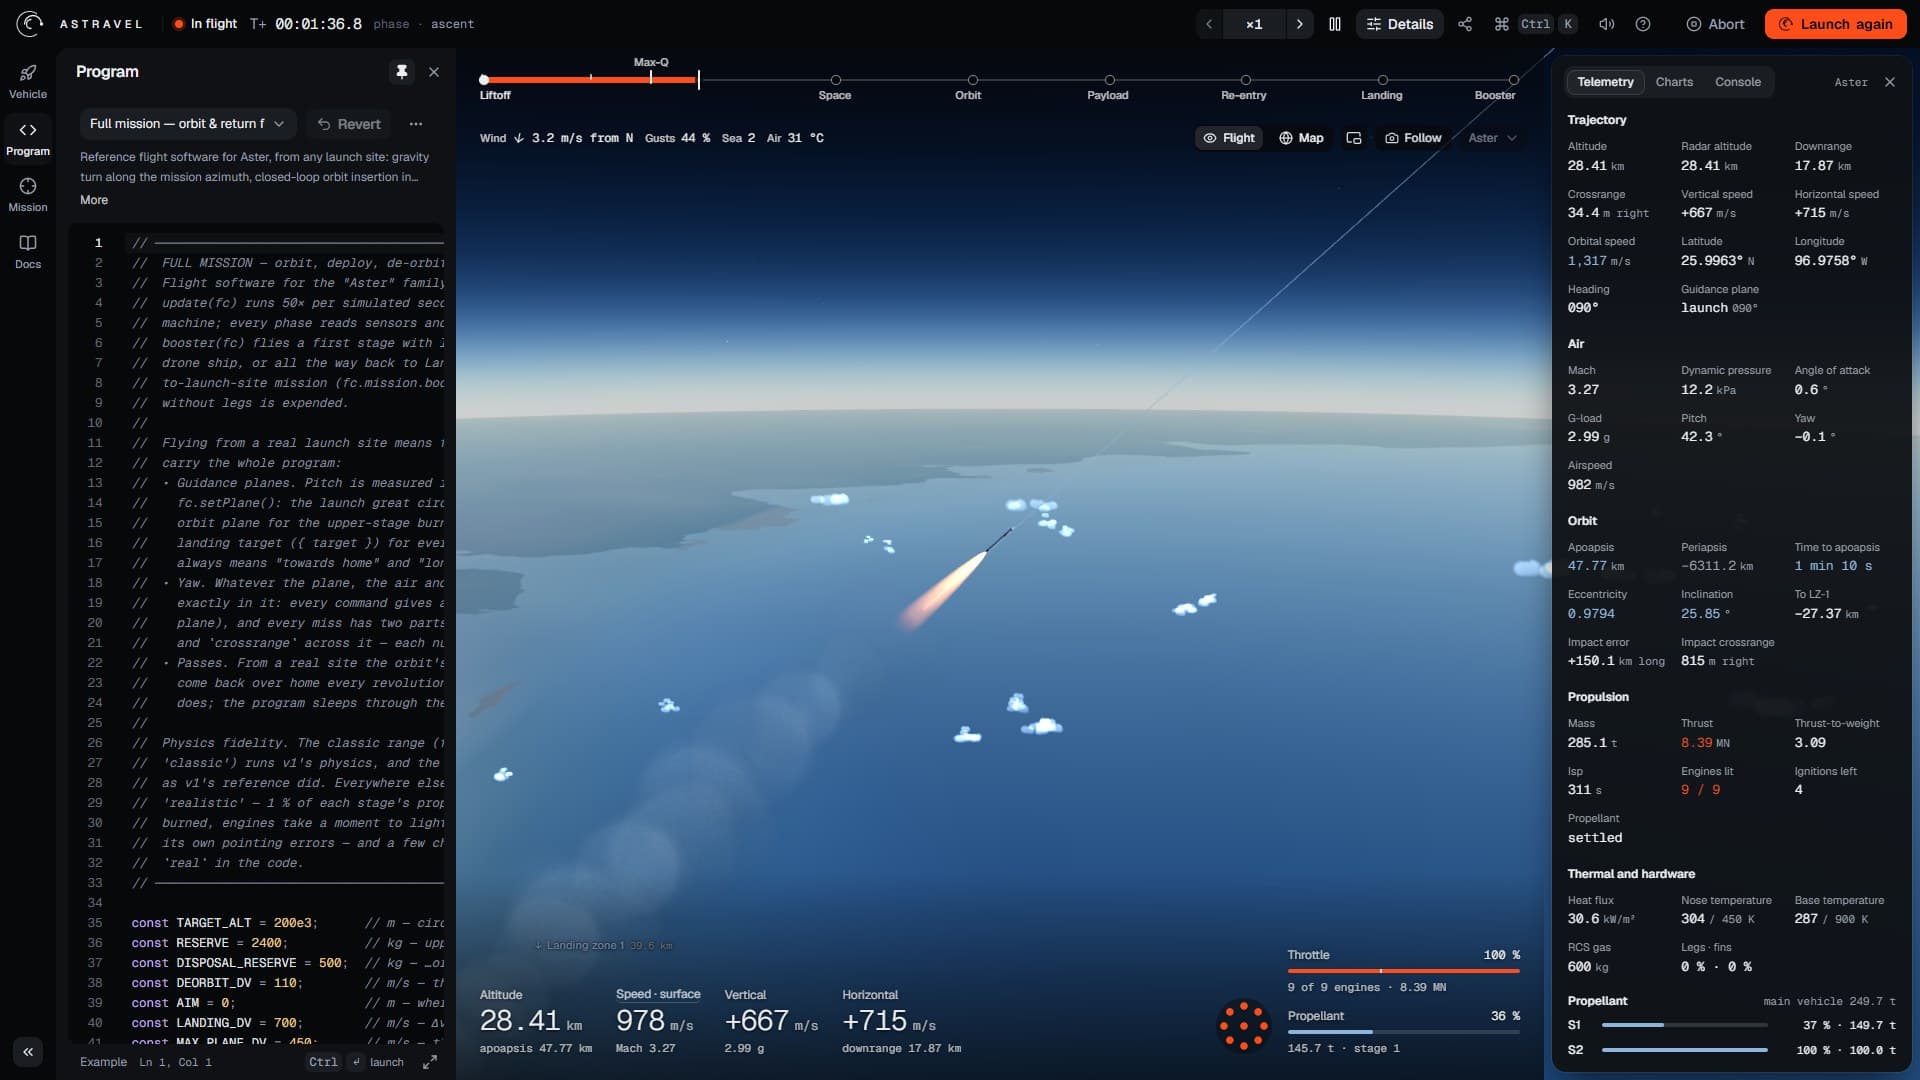
- 1The top bar: status, mission clock and phase on the left; the flight controls and Launch on the right.
- 2The rail: Vehicle, Program, Mission and Docs.
- 3The workbench panel — here Program, with the flight software that is flying.
- 4The mission timeline: milestones as they happen, burns in orange.
- 5View tools: flight or map, the inset map, the camera and which vehicle to follow.
- 6The flight view: the vehicle, the Earth, the weather.
- 7Readouts: altitude, speed, vertical and horizontal speed.
- 8Engines, throttle and propellant.
- 9Details: telemetry, charts and console.
The top bar
The left half of the bar says what is happening. A dot and a word give the
flight's state — On the pad, Ignition, In flight, In orbit once the
periapsis is above 140 km, Landed, Lost, and at the end Mission success,
Partial success or Mission failure. The dot is orange only while an engine
is burning. Next to it runs the mission clock, T+ hours, minutes and seconds to
a tenth, and after that phase · …, which is whatever your program last wrote
into fc.phase. The simulator never reads it; it is there so you can see which
branch of your program is running.
The right half holds the controls, in the order they are usually needed.

- 1Time warp: slower, the current rate (a menu of every rate), faster.
- 2Pause and resume.
- 3Details: telemetry, charts and console.
- 4Share, export and import.
- 5The command palette.
- 6Sound and the mission voice.
- 7Keyboard shortcuts.
- 8Abort the flight, or Back to pad once it has ended.
- 9Launch, or Launch again.
- Time warp steps through ×1, 2, 5, 10, 25, 50, 100, 500 and 1000, and As
fast as possible at the end of the menu. When your program asks for a rate
with
fc.warp(), the button carries the word program. When the computer cannot keep up, an amber actual ×… appears beside it with the rate really achieved. The physics is the same at every rate: warp only decides how much simulated time passes per frame. Watching a flight covers it in full. - Pause freezes the flight and puts a Paused label over the view. There is nothing to pause before launch or after the end.
- Details opens the sheet on the right of the view. A red dot on it means your program has thrown an error you have not looked at yet.
- Share is a menu: Share this flight…, Import a flight or program file…, Export telemetry (.csv) and Download the program (.js) — see sharing below.
- Abort appears once a flight is running. It asks first, then puts the vehicle back on the pad. After the end the same button reads Back to pad and does not ask.
- Launch is the one orange control in the interface, because pressing it lights the engines. During a flight it reads Launch again and asks before throwing the current flight away.
After a flight ends a Flight report chip appears at the left of the controls, its icon coloured by the outcome. It reopens the report.
The workbench
The rail down the left edge has four panels: Vehicle, Program, Mission and Docs. Clicking one opens its panel; clicking it again, or the cross in the panel's corner, closes it, and the chevrons at the foot of the rail do the same. The panel you last used and whether it was open are remembered.
- Vehicle — the rocket: presets, stages, engines, propellant, and the checks and Δv budget that judge it. The vehicle workbench.
- Program — the flight software, in a code editor, with your library of programs and the examples. The program editor.
- Mission — where and under what conditions it flies: demo missions, the launch site, the destination and launch window, the profile, the landing targets, the weather, the launch time, failures and sensors, Monte-Carlo batches and the objectives. Planning a mission.
- Docs — the flight computer's guide and reference, searchable, inside the app. The Docs panel.
When you launch, the panel slides shut and the flight view takes the width. It comes back when you abort or return to the pad. The pin in the panel's header — Keep this panel open during flights — stops it closing, which is how the picture above was taken.
If you change the vehicle, the program or the mission while a flight is in the air, the flight carries on with what it was launched with. The rail marks the changed panel with an amber dot, and the panel says so — Design changed — launch again to fly it — until you do.
The flight view
Everything to the right of the workbench is the flight: the vehicle, the Earth under it, and the weather over the launch site. Across the top runs the mission timeline, which lays out the milestones of the mission profile and fills them in as they happen. Under it on the right are the view tools: Flight or Map (M), the inset trajectory map (N), the camera menu (C steps through its modes), and a picker for which vehicle the camera and the numbers follow once a booster has separated.
In flight, the big readouts sit bottom left and the engine and propellant block bottom right. Before launch, the same place holds the launch-readiness card, and during a flight a card explains any vehicle that is lost. Watching a flight goes through all of it, and the map view covers the globe and the solar system.
To move the camera with the keyboard, the view needs the focus: click it, or press Tab from the top of the page, whose first stop is Skip to the flight view. Then the arrow keys orbit, + and − zoom, and R resets.
Details
T, or the Details button, opens a sheet over the right of the view with three tabs: Telemetry, Charts and Console. It does not stop the flight or take the keyboard: every shortcut still works with it open. The name in its header is the vehicle it is reading, which follows the focus picker in the view tools.
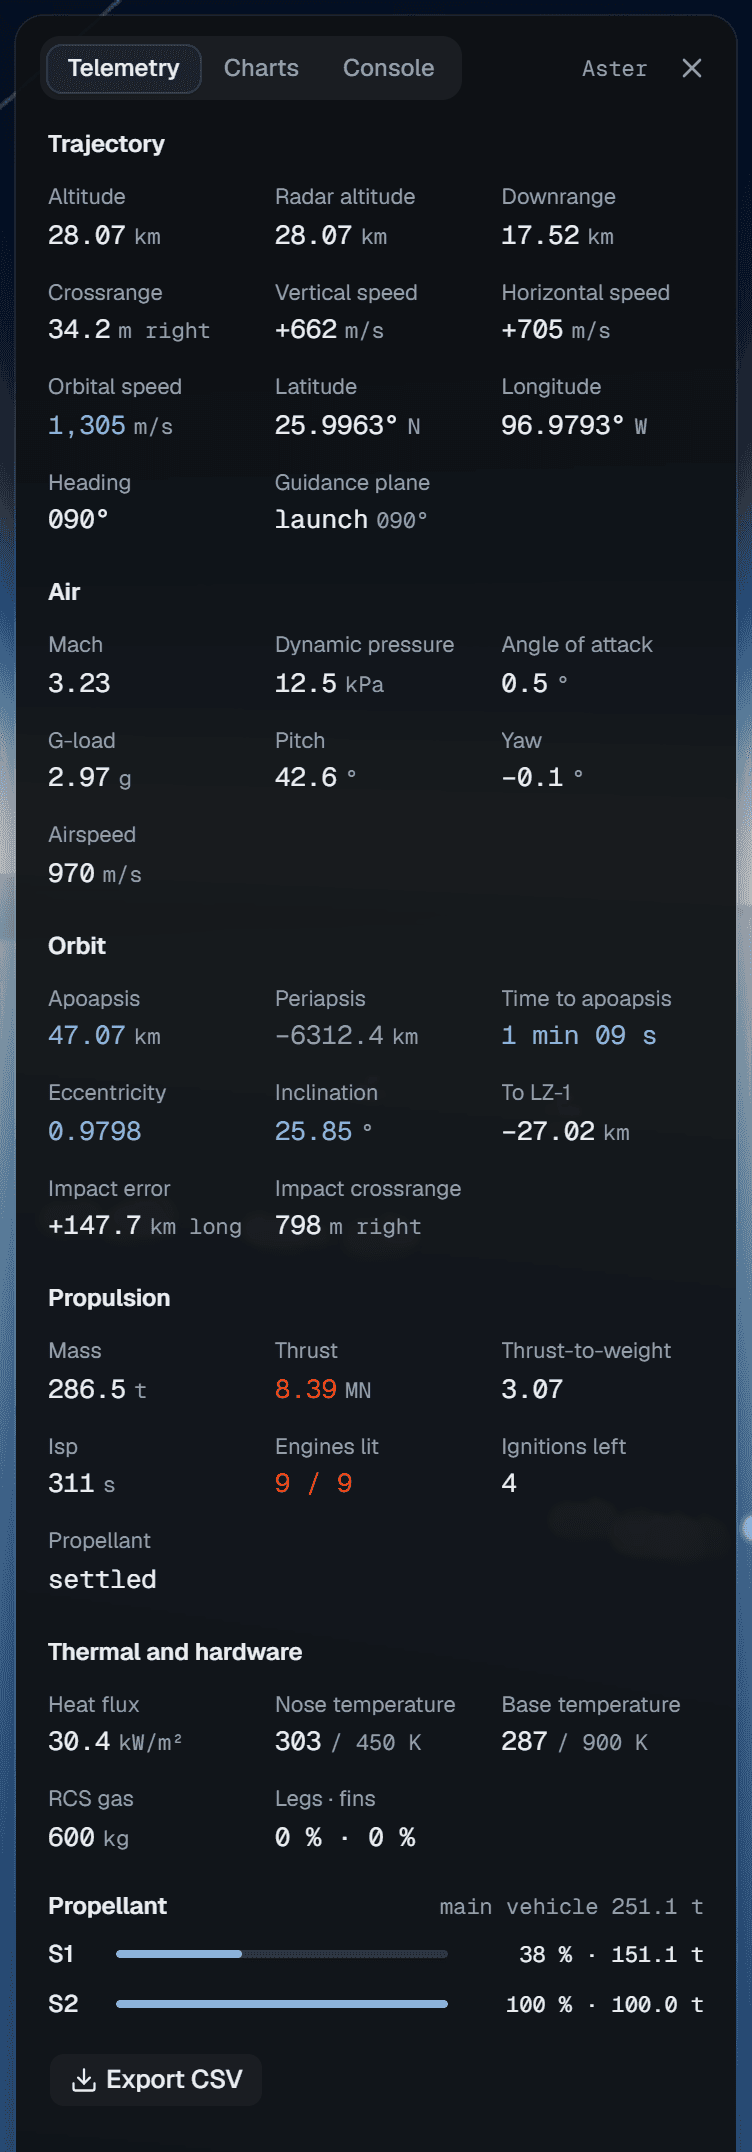
Telemetry is the flight computer's view of the vehicle — trajectory, air, orbit, propulsion, thermal state and hardware — with a gauge per stage for the propellant and an Export CSV button. When the mission flies noisy sensors, a Show truth switch lays the sensed values beside the true ones. Charts and the console are covered with the editor, because they are where you debug a program: telemetry, charts and console.
Opening the playground
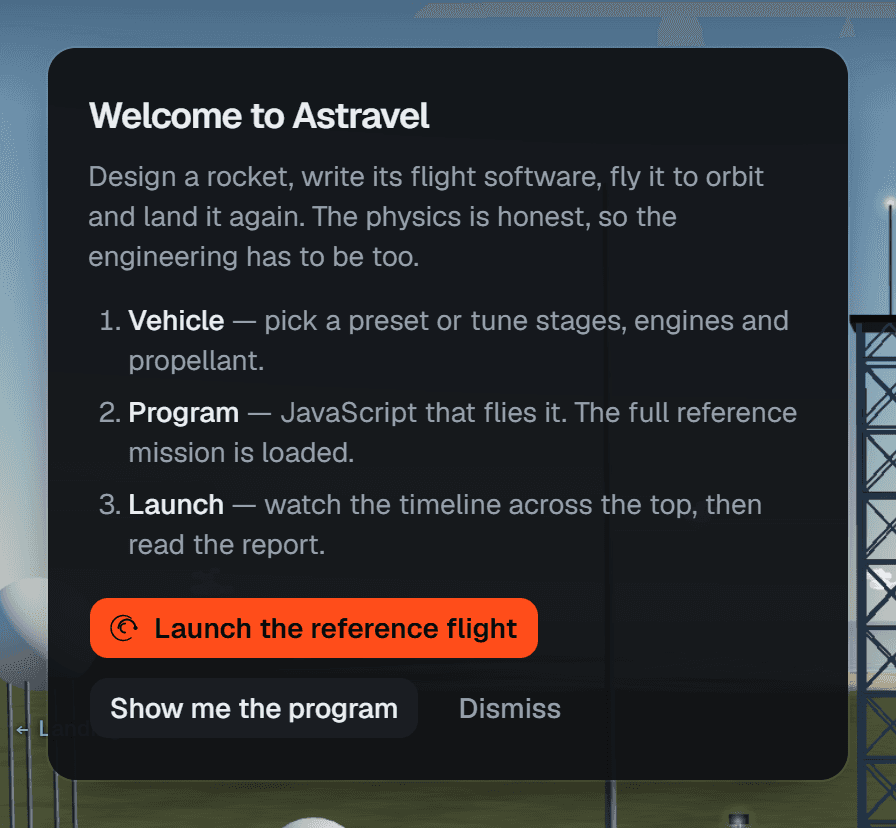
The first time, a card welcomes you over the pad. It names the three steps — Vehicle, Program, Launch — and offers three ways on: Launch the reference flight flies the default mission at once, Show me the program opens the Program panel, and Dismiss closes the card. It does not come back.
From then on, the pad shows the launch-readiness card instead. Its title is
Ready for launch, Ready, with notes or Check before launch, and each line
under it is one thing the playground checked: the design, the Δv to orbit, that
the program compiles, the mission profile and site, and the weather. A green
dot is good, amber a note worth reading, red a problem. Clicking a line opens
the panel it is about, and some lines carry a button that fixes them — Load
Full mission when a booster with legs has no booster(fc) to fly it home, for
instance.

The card updates as you edit. It is a summary, not a gate: L launches whatever it says, unless the vehicle cannot be built at all or the program does not compile.
Demo missions
The quickest way to see what the simulator can do is Mission › Demo missions. Each demo loads everything that has to agree — the vehicle, the program, the launch site and the mission settings — in one click, and for the Moon and Mars it also searches for a real launch window and selects it. The toast says … is loaded — press Launch.
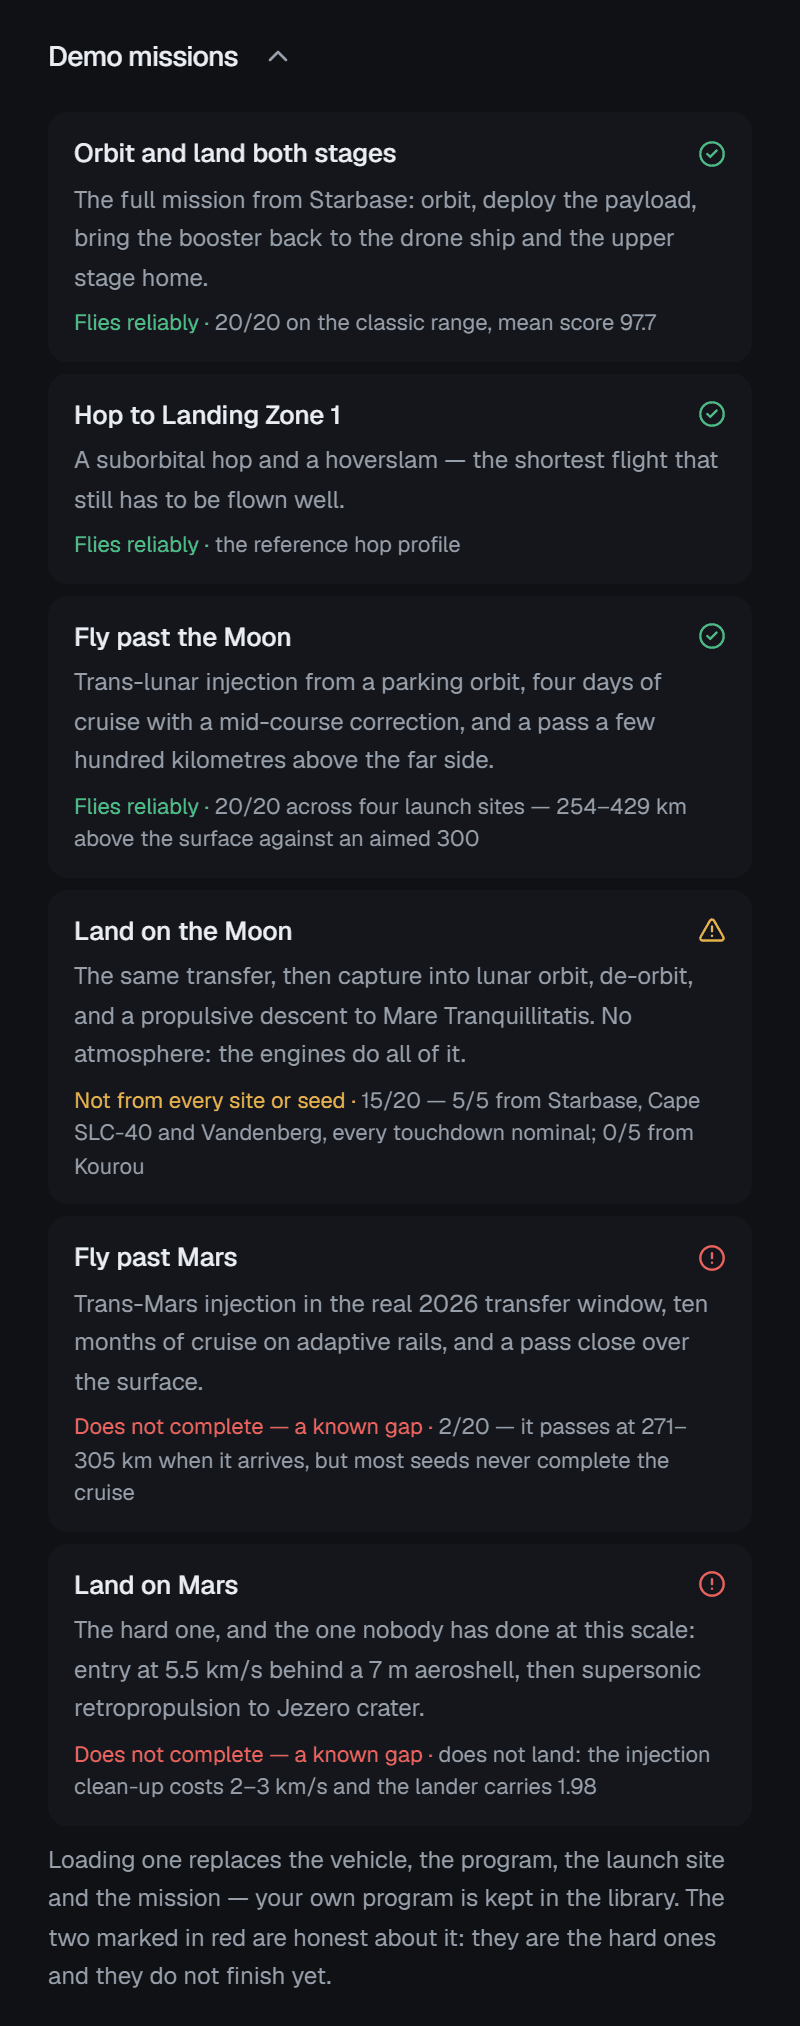
| Demo | Vehicle | Program | How well it flies |
|---|---|---|---|
| Orbit and land both stages | Aster | Full mission | Reliably: 20/20 from Starbase, both stages landed on every seed, mean score 99.2 |
| Hop to Landing Zone 1 | Hopper | Hop | Reliably |
| Fly past the Moon | Odyssey | Moon flyby | Reliably: 20/20 from four sites, 256–366 km above the surface |
| Land on the Moon | Odyssey | Moon landing | Reliably: 20/20 from four sites, every touchdown graded nominal |
| Fly past Mars | Odyssey Mars | Mars flyby | Reliably: 20/20 from four sites, 337–446 km above Mars |
| Land on Mars | Odyssey Mars | Mars landing | Does not complete: it does not land |
All six launch from Starbase. The Mars landing is marked in red in the list because it does not finish, and the panel says so rather than letting you find out ten simulated months into a cruise. Loading a demo replaces the vehicle, the program, the site and the mission, but not your own programs: they stay in the library. The same demos are in the command palette as Demo: ….
The command palette
Ctrl K (⌘ K on a Mac), or the button with the command symbol in the top bar, opens a list of every action in the playground, grouped: Flight, Time warp, View, Camera, Panels, Program, Vehicle, Mission, Share and Help. Type to filter it, use the arrow keys, and press Enter to run one.
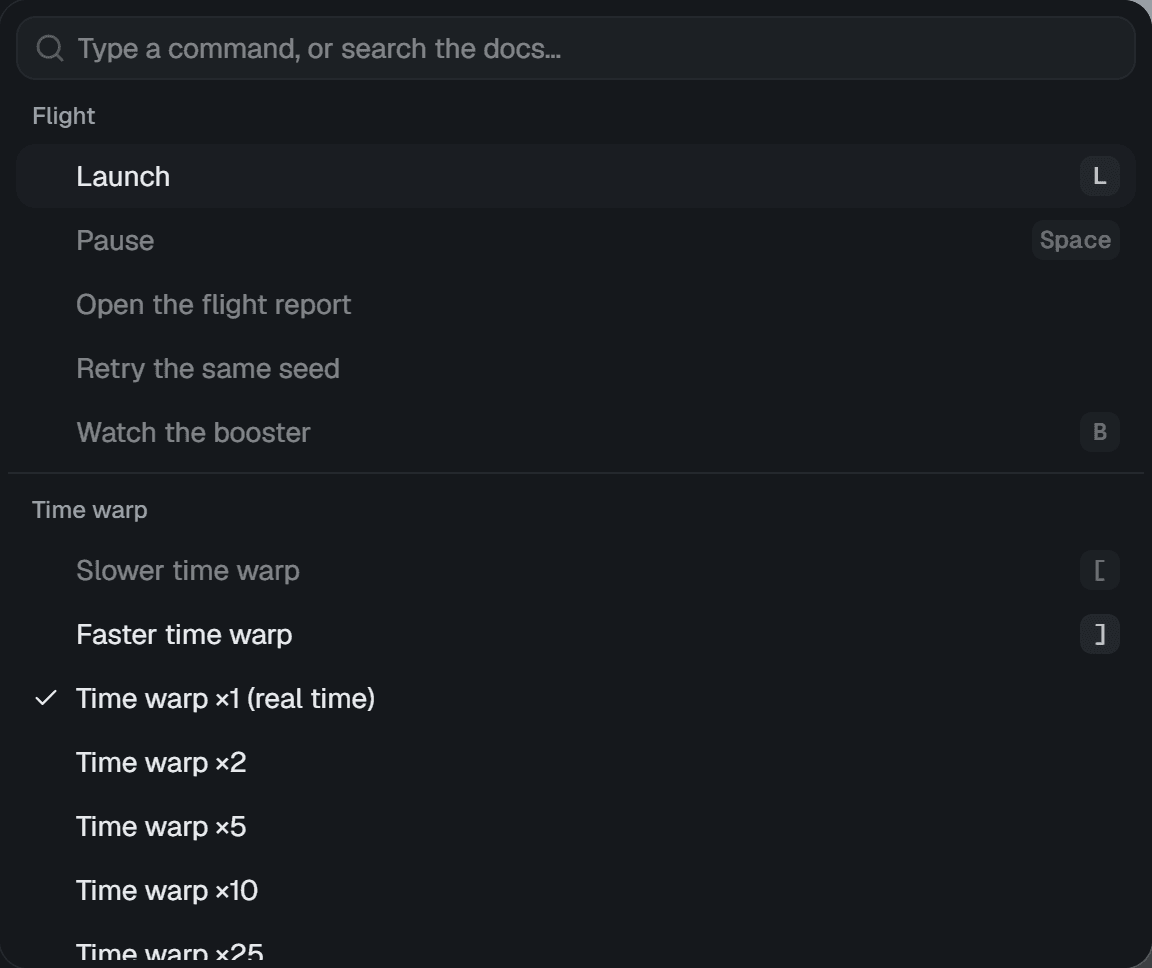
The list is rebuilt every time it opens, so its labels follow the state — Launch or Launch again, Pause or Resume — and anything that cannot run right now is shown greyed rather than hidden. It is also the only place some things live in one list: every vehicle preset (Vehicle preset: …), every mission profile, every example program (Use example: …), the six demos, the label density in the scene, and Lock the weather seed.
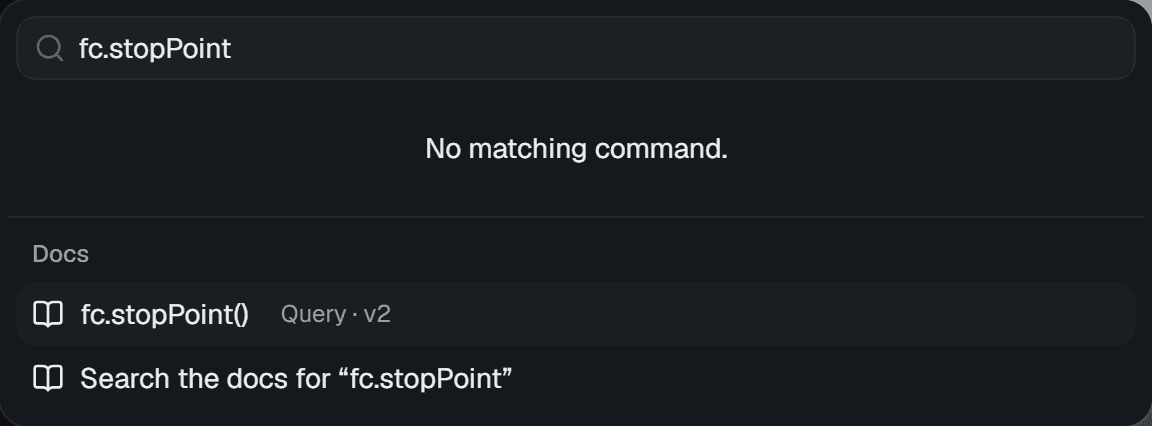
Whatever you type is also a search of the docs. Under the commands, a Docs group lists matching entries of the flight computer reference and the guide, and ends with Search the docs for "…", which opens the Docs panel filtered on your words.
Keyboard shortcuts
? opens the full list inside the app. These are all of them.
| Keys | What they do |
|---|---|
L | Launch, or launch again |
Ctrl Enter | Launch from anywhere, including from inside the editor |
Space | Pause or resume |
[ and ] | Slower and faster time warp |
T | Details: telemetry, charts and console |
M | Flight view or map view |
N | The inset trajectory map |
V | Mute or unmute the sound |
C | The next camera mode |
B | Watch the booster, and back to the main vehicle |
R | Reset the camera |
| Arrow keys | Orbit the camera (the flight view needs the focus) |
+ and − | Zoom (the flight view needs the focus) |
Ctrl S | Save the program and keep a history snapshot |
Ctrl K | The command palette |
? | The list of shortcuts |
Esc | Close a dialog, a menu or the card explaining a loss |
On a Mac, ⌘ takes the place of Ctrl. The editor adds its own keys, listed
with the editor.
A few rules keep the keys out of your way. Single-key shortcuts do nothing
while you are typing, in a field or in the editor; the Ctrl combinations work
everywhere. Space does not pause while a button or a switch has the focus,
because Space presses it — except for Launch and Abort, which never take Space,
so a stray press cannot launch or abort anything. And while a dialog or a menu
is open, it has the keyboard; only Ctrl K gets through.
Sharing, exporting, importing
Share this flight… opens a dialog that packs the vehicle and the mission — the launch site, the weather and everything else — into a link or a file. The program goes in only if you turn on Include the program. Copy link builds the link and copies it, and says how large it is: very long links do not survive every chat app, and Download file always works. Nothing leaves your browser until you send it yourself.
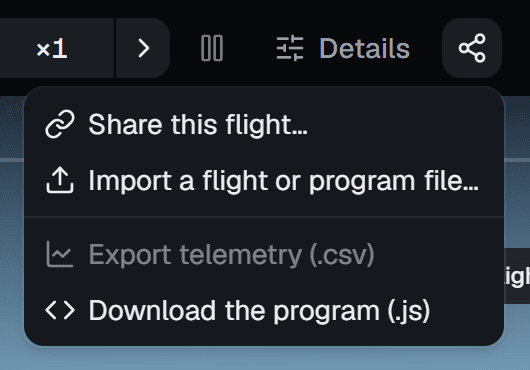
The share menu, on the pad.
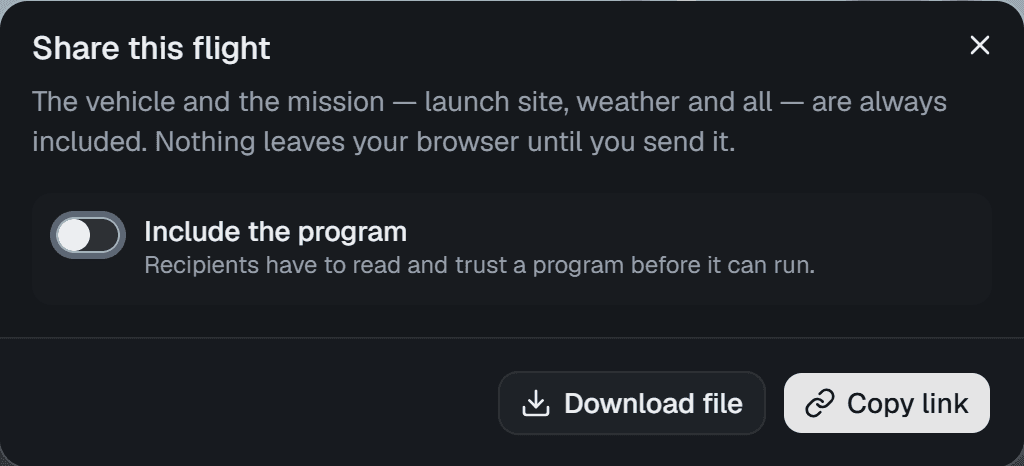
Share this flight.
Opening a shared link or file asks before it replaces anything. A program that arrives that way is added to your programs as untrusted: it will not compile or run until you have read it and pressed Trust and run this program, because a program runs inside the page with the page's own access. The program editor shows what that looks like.
The other entries of the menu:
- Import a flight or program file… takes a
.jsonflight file or a.jsprogram. - Export telemetry (.csv) saves what the flight recorder kept for the vehicle in focus: time, altitude, vertical and horizontal speed, pitch, dynamic pressure, Mach, thrust, throttle, propellant, g-load, heat flux, downrange, angle of attack, base temperature, mass, latitude, longitude and crossrange, ten times a second (once a second while coasting engine-off above 150 km).
- Download the program (.js) saves the program in the editor.
Sound
The speaker button opens the sound settings. Sound turns everything on or off, and V does the same from the keyboard. Master and Effects set the volumes. The Mission voice reads out the flight the way a launch broadcast does — "Ignition", "Liftoff", "Max Q", "Stage separation confirmed", "The booster has landed" — in a voice you can choose (Automatic (best English) picks one) at a rate from ×0.5 to ×2. Test plays a chime and says "Go for launch".
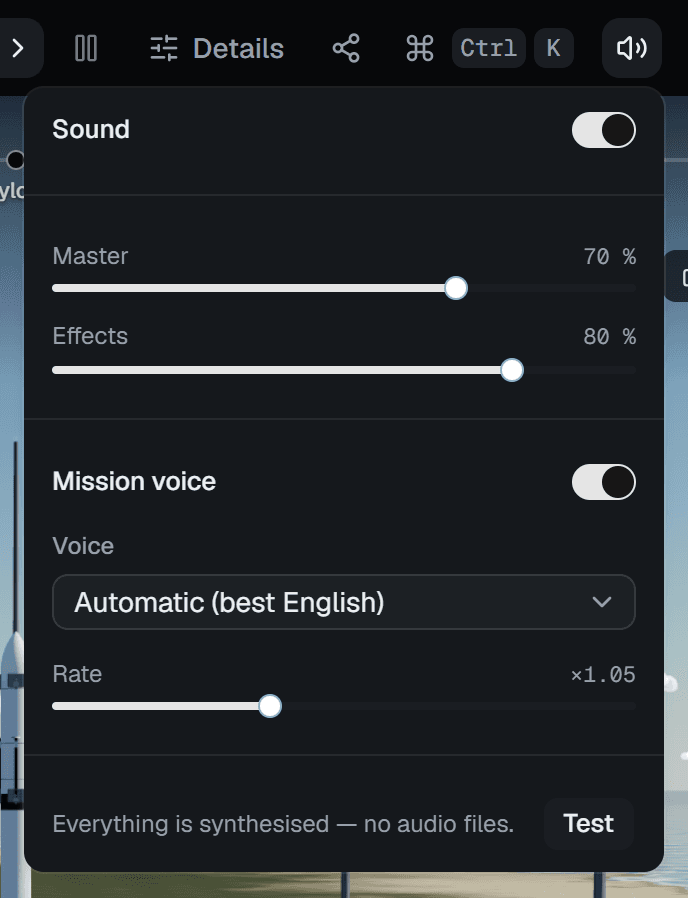
Everything you hear is synthesised in the browser; there are no audio files. The voice uses the speech voices installed on your system, and if there are none the switch says so and the callouts stay silent. Browsers only allow sound after you have interacted with the page, so it starts with your first click or key press.
What is kept
The playground saves as you go, in this browser's local storage: the vehicle, the mission, your programs and their history, and the interface itself — which panel is open and whether it is pinned, the Details tab, the view, the camera, the label density and the sound settings. Nothing is sent anywhere. Another browser, or a private window, starts from the defaults; a shared link or file is the way to move a flight between them.
There is one theme, and it is dark: the flight view is the picture, and the controls recede around it.
On a phone
Below 900 pixels wide the layout folds. The top bar splits into two rows — the status, the clock and Launch above, the controls below — and the rail and both sheets become a single drawer along the bottom edge, with five tabs: Vehicle, Program, Mission, Data (the Details sheet) and Docs.
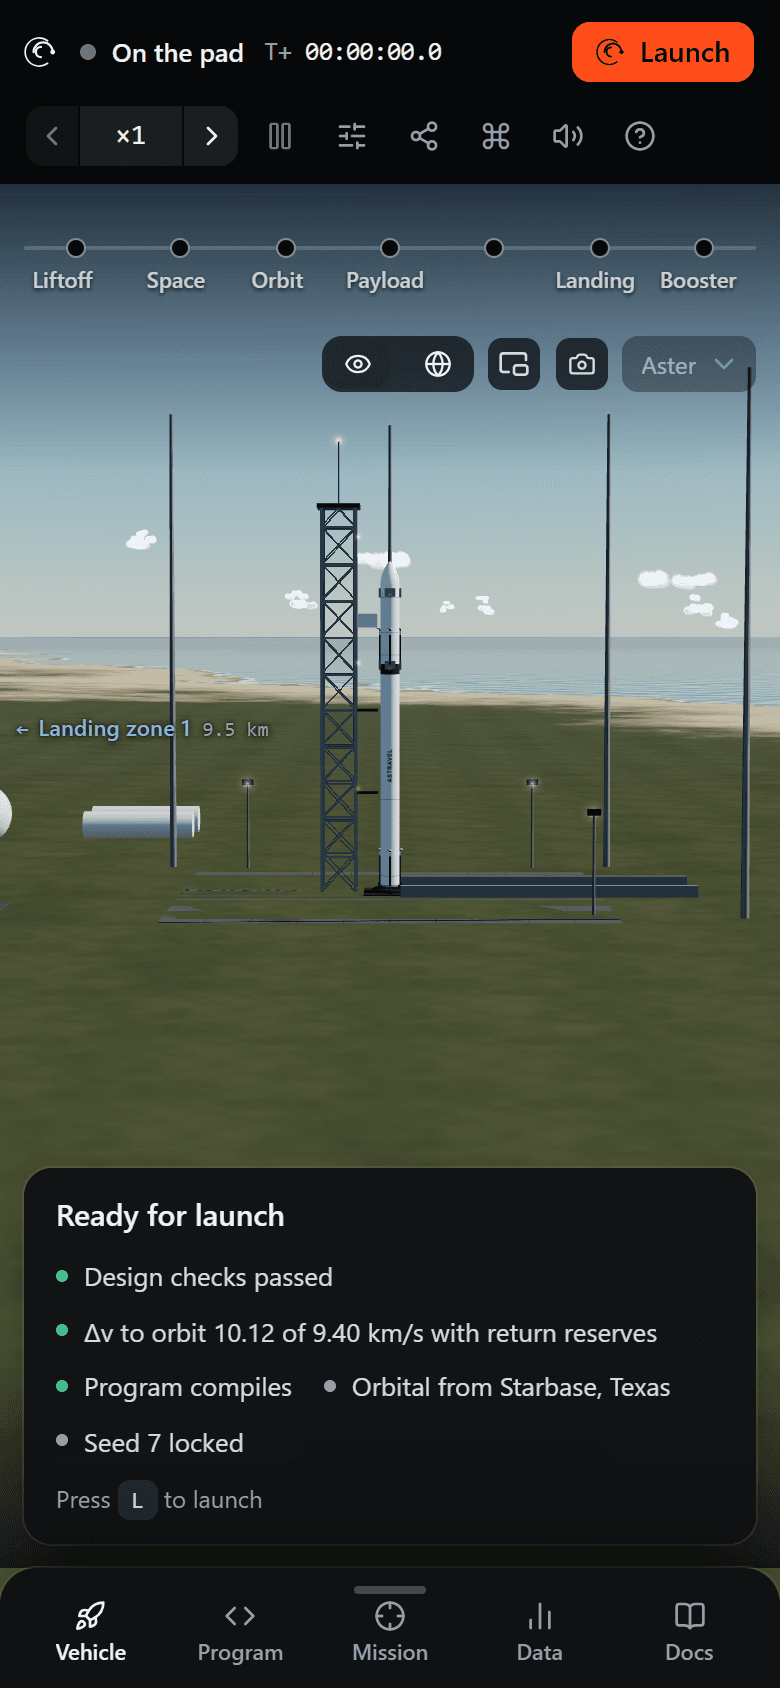
On the pad, drawer lowered.
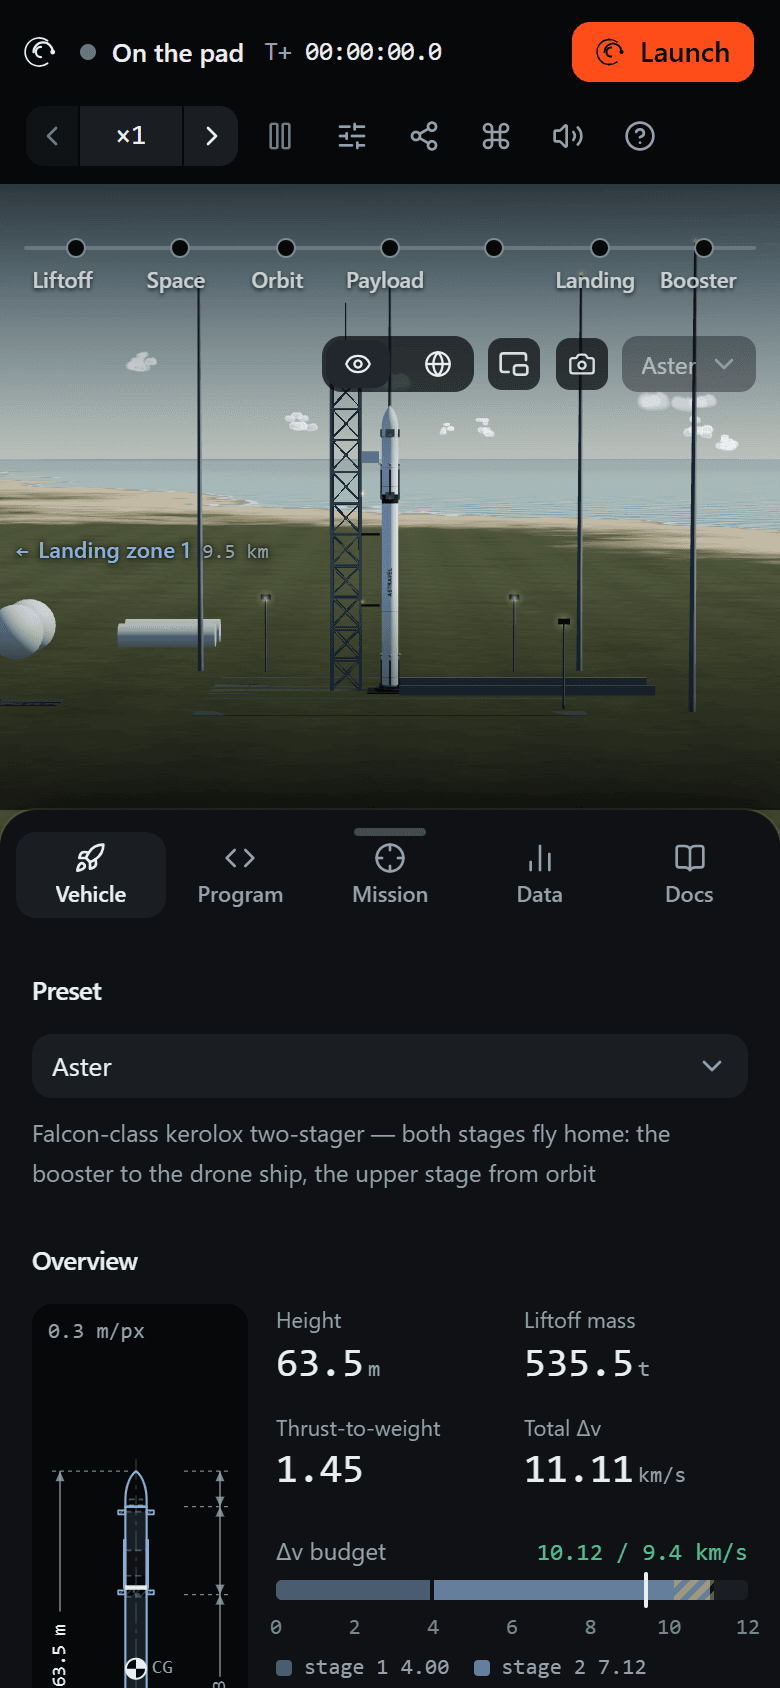
Vehicle, drawer half up.
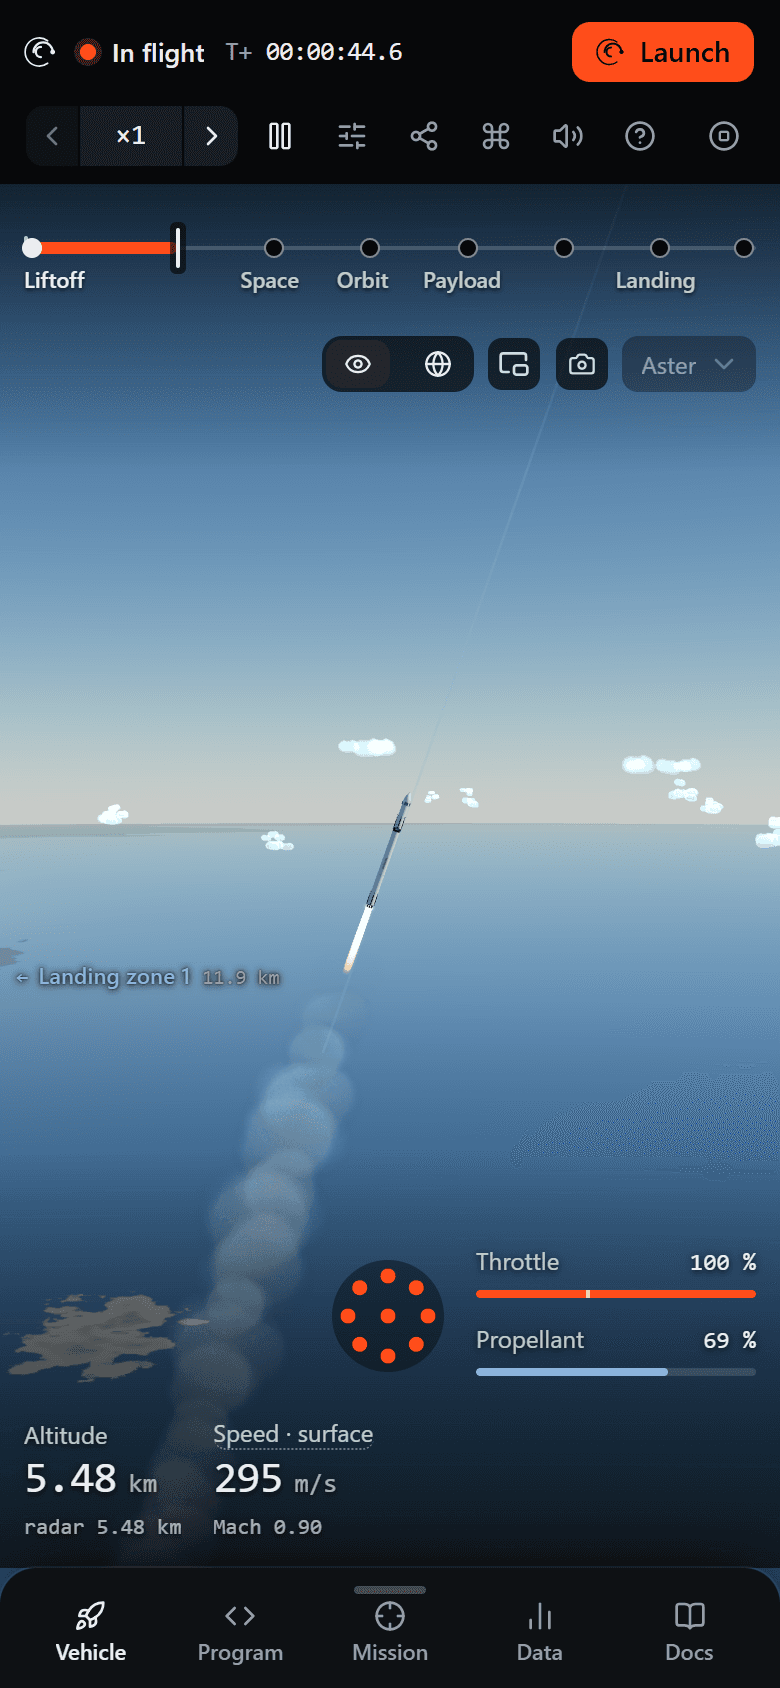
In flight.
Tapping a tab raises the drawer to half height — Program goes to full height, since code needs the room — and tapping the selected tab lowers it again. The grip at the top of the drawer cycles lowered, half and full, or can be dragged, and snaps to the nearest of the three. Launching lowers the drawer, the way the panel closes on a desktop.