The playground
Planning a mission
Launch sites anywhere on Earth, destinations and real launch windows, live weather and the go/no-go board.
The vehicle and the program say what flies. The Mission panel says everything else: where it lifts off, which way it goes, where each stage comes down, whether it leaves Earth, what the weather is, and which random numbers the flight draws. Open it from the Mission tab in the rail on the left of the playground; the tour shows where that is.
Every section folds away, and a folded section keeps a one-line summary of what it holds, so the whole mission reads from top to bottom without opening anything. Launch site, Destination, Profile, Landing and Weather start open; the rest start folded.
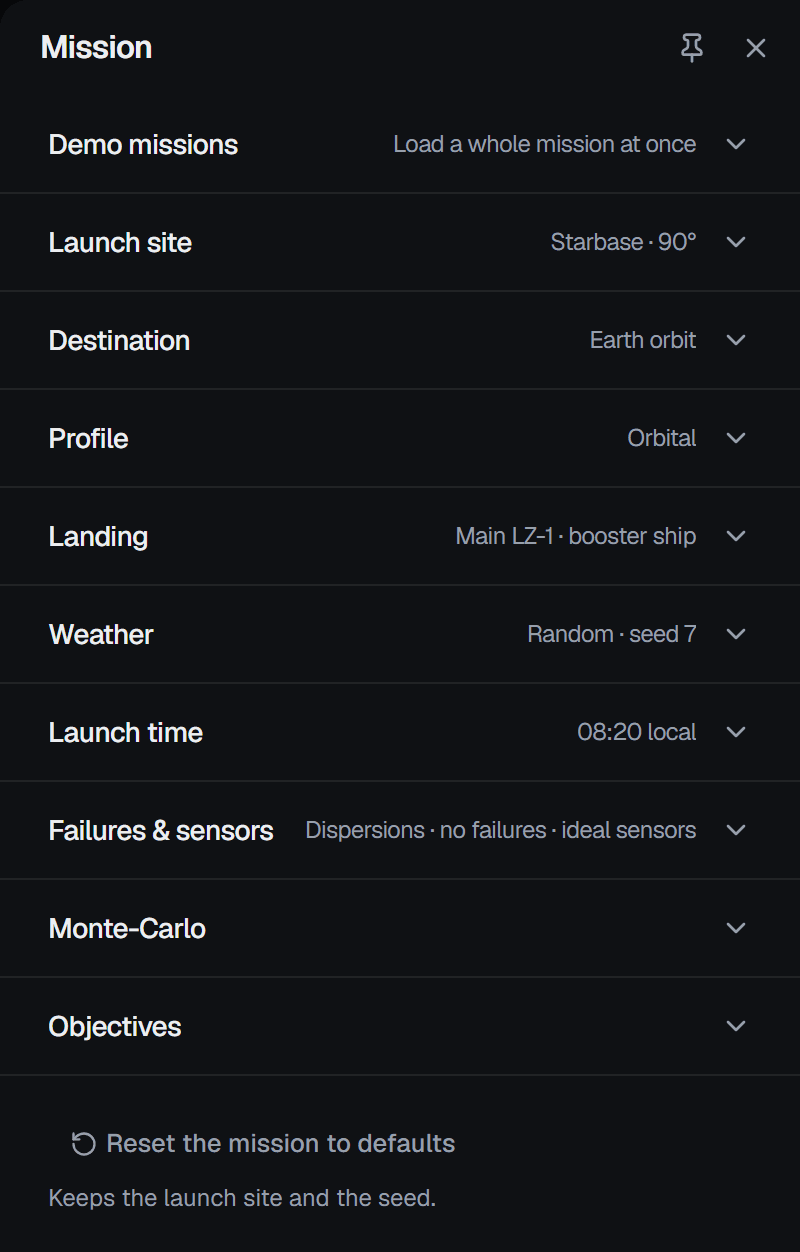
Nothing in the panel changes a flight that is already in the air. Change the mission during a flight and a note at the top of the panel says so: Mission changed — launch again to apply. Reset the mission to defaults, at the foot of the panel, puts every field back except the launch site, its azimuth and the seed.
Demo missions
A demo loads everything a mission needs in one click: the vehicle, the program, the launch site and the mission settings, and for a flight to the Moon or Mars a real launch window as well. Without it, flying to the Moon means knowing that the Earth presets cannot reach it, which vehicle can, which of the destination programs matches the arrival you want, and that a window has to be searched for and chosen first.
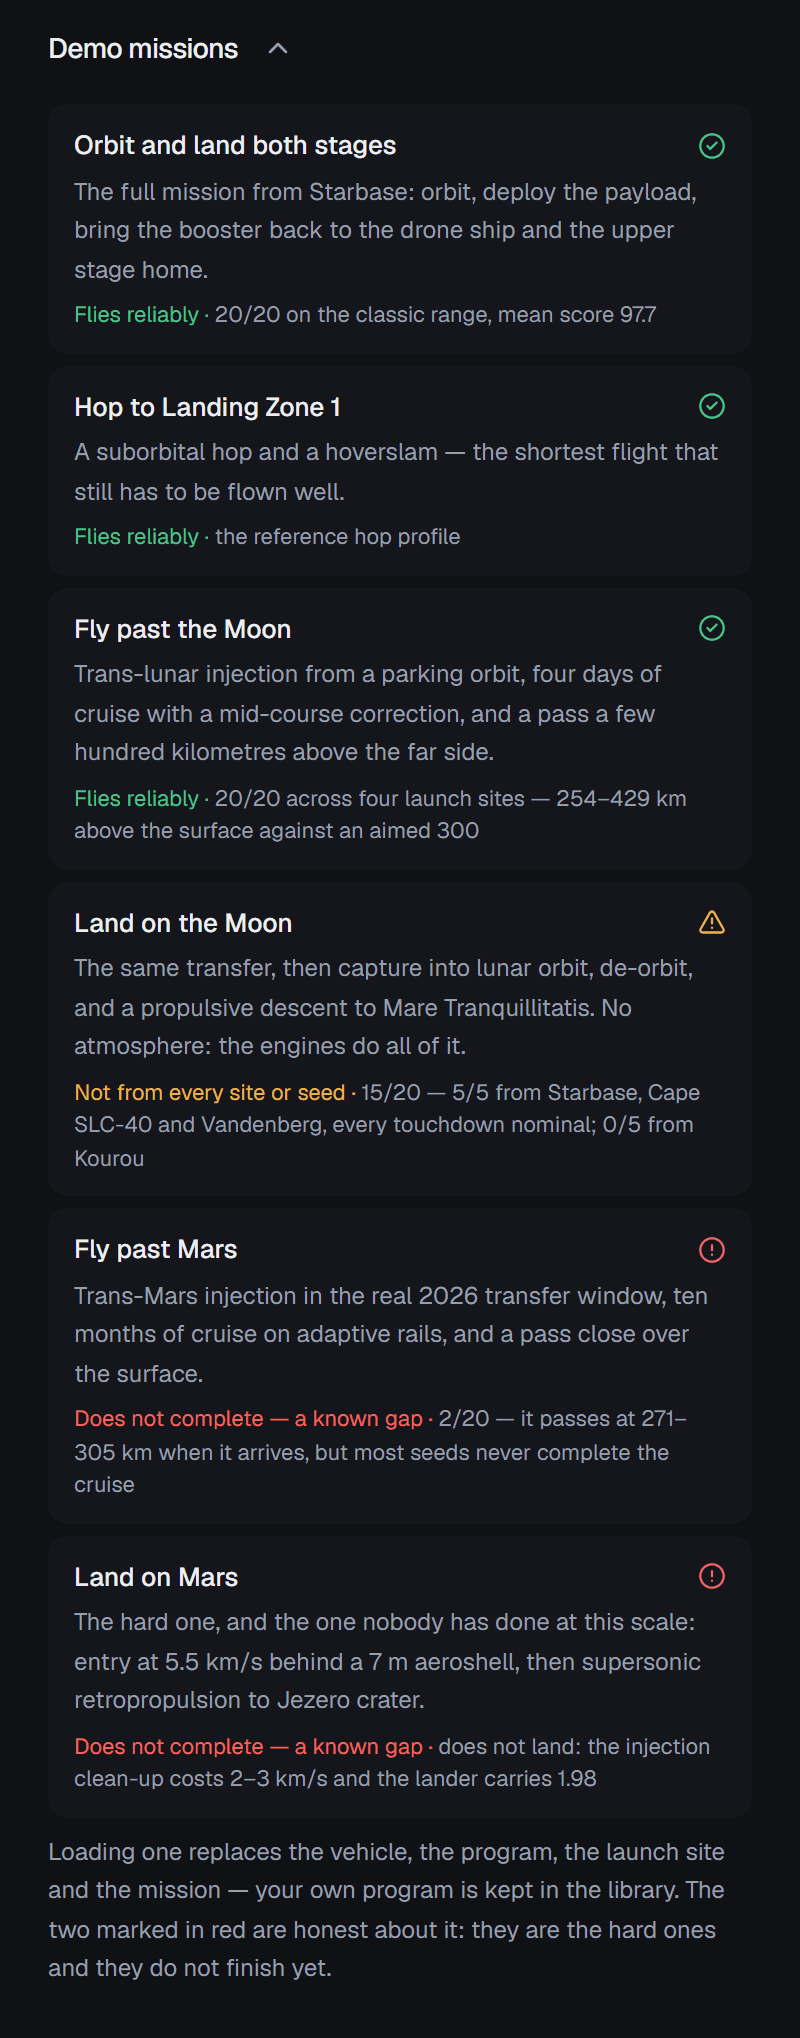
- 1Status icon: green, amber or red.
- 2The status in words, then the evidence it rests on.
- 3Flies, but not from every site or seed.
- 4Does not complete — a known gap.
Each card says how well the demo actually flies, measured rather than hoped for: Flies reliably, Not from every site or seed, or Does not complete — a known gap, followed by the numbers behind it. The two Mars demos are red because they do not finish yet; missions and destinations explains why. The evidence is what the acceptance runs measured on their own sites and seeds. It describes those flights, not every seed you might draw.
Loading a demo replaces the vehicle, the program, the launch site and the mission. Your own program is not lost: it stays in the library, and the program editor gets it back. A message confirms the load — Orbit and land both stages is loaded — press Launch. — and the command palette (Ctrl + K, ⌘ K on a Mac) lists the same six as Demo: … entries.
For the Moon and Mars demos, the window is searched from the date their acceptance runs used — 1 October 2026 for the Moon, 31 October 2026 for Mars — and the cheapest feasible window is chosen. They load with random weather, for the reason given under launch windows.
The launch site
Choosing a place
The card at the top of the section names the site, its country, its elevation and its coordinates. Click it to open the site picker: one list for every way of putting the starbase somewhere.
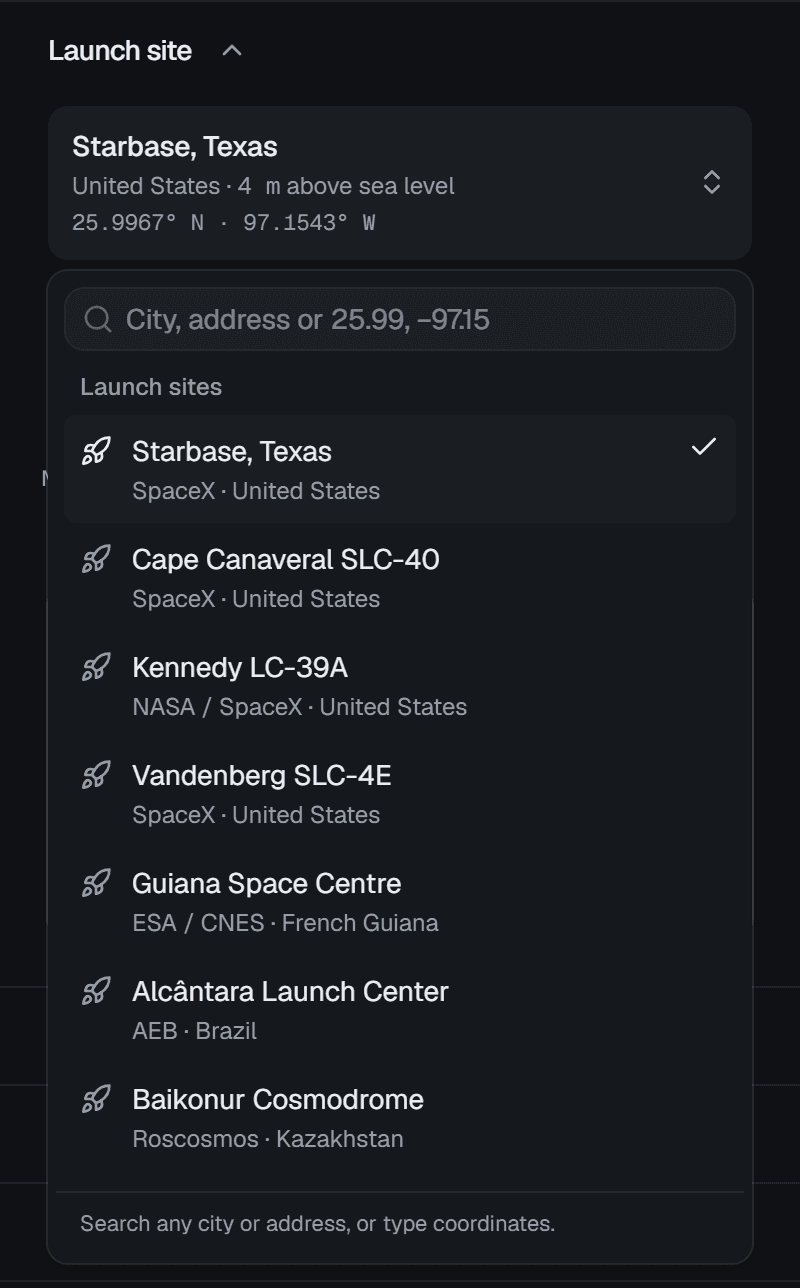
- 1Search: a city, an address, or coordinates typed as 25.99, −97.15.
- 2The launch-site presets, the current one ticked.
- 3Further down the list: Use my location and Pick on the map…
- Launch sites — twelve presets: Starbase, Cape Canaveral SLC-40, Kennedy LC-39A, Vandenberg SLC-4E, the Guiana Space Centre, Alcântara, Baikonur, Tanegashima, Wenchang, Satish Dhawan, Rocket Lab LC-1 at Mahia, and the Classic equatorial range. Each preset comes with its usual launch azimuth and a one-line note about the site, and four of them — the two Florida pads, Vandenberg and Mahia — bring their real landing zone.
- Places — type a city or an address and the matches appear as you type. Coordinates answer at once, without a search. If the address service cannot be reached, only the city search answers and the list says so; coordinates and the map always work.
- Use my location asks the browser where you are, and only when you pick it.
- Pick on the map… opens the map dialog below.
A searched or picked place is not a preset, so the playground finds out what it needs: the ground elevation from the Copernicus digital elevation model, through Open-Meteo, and the country from the Natural Earth borders. While it does, the card says Finding Reykjavik… (elevation and country); afterwards the note under it says where the place came from. The terrain around any site is the real land and sea. If the current azimuth would put the drone ship on land from the new site, a new azimuth with sea under the ship is chosen.
The classic range is the simulator's original stylised world: a pad on the equator, launching due east, with every flight in one plane. Its azimuth cannot be changed, it has no preview map, and it has no live weather.
Picking on the map
The map dialog opens from Pick on the map… in the picker or from the expand button in the corner of the preview map. Drag to pan, scroll or use + and − to zoom, and click to drop a pin. Before anything changes, the line under the map reads the pin back: its coordinates, the country, and the elevation once it has been fetched. A pin at sea is allowed — At sea — the pad will stand on a platform. — and Set the starbase here moves it.
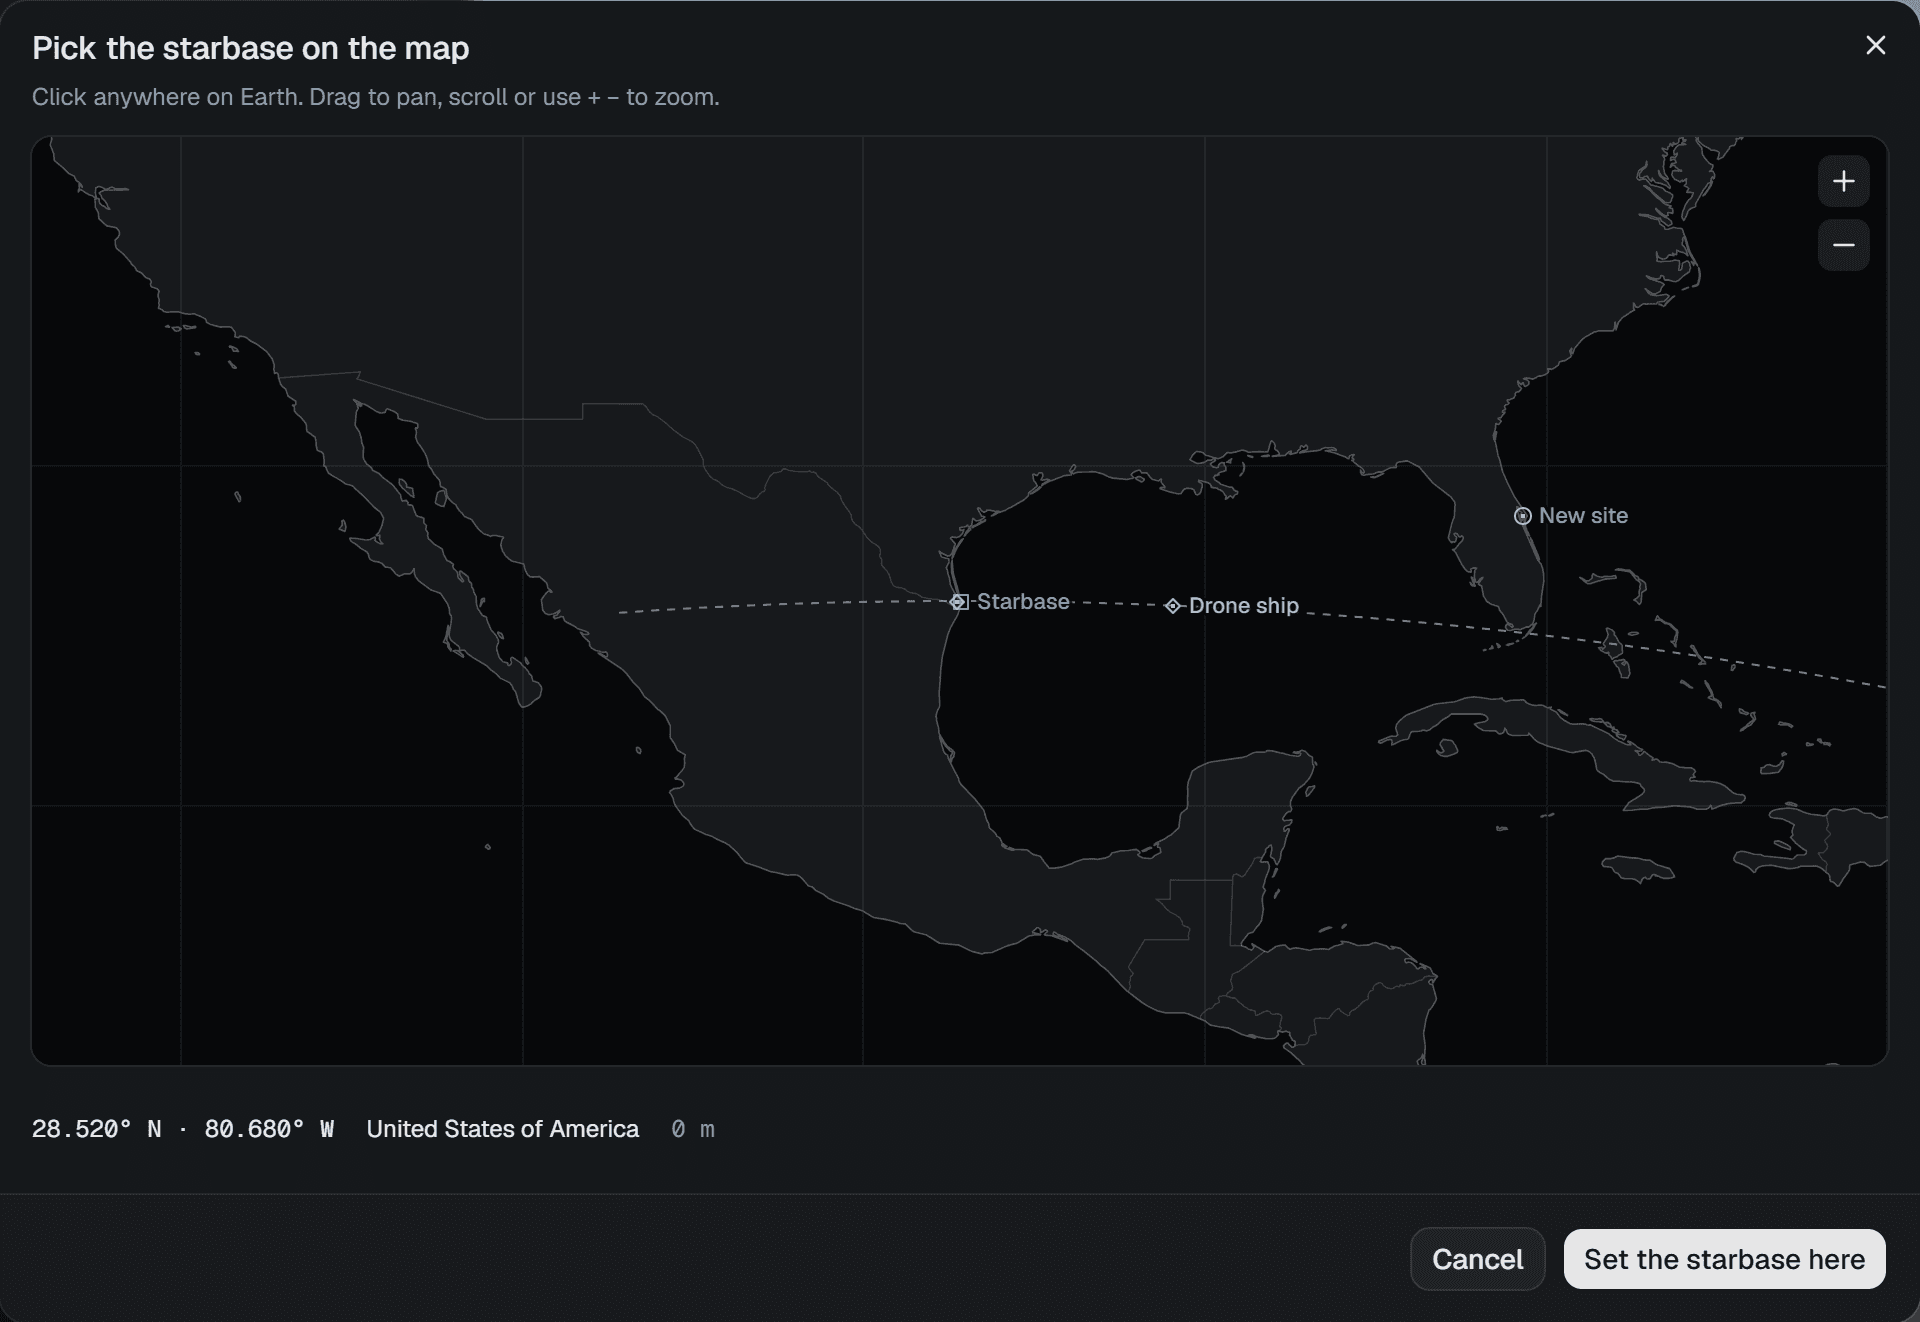
- 1The pin, labelled New site.
- 2The current pad, the drone ship and the launch azimuth's great circle.
- 3Zoom in and out.
- 4Where the pin is: coordinates, country, elevation.
- 5Set the starbase here, or Cancel.
The same dialog places Landing Zone 1, from the Landing section. There it is framed on the pad, the readout gives the distance and bearing from the pad, and a point at sea cannot be confirmed — At sea — LZ-1 needs land.
Azimuth and inclination
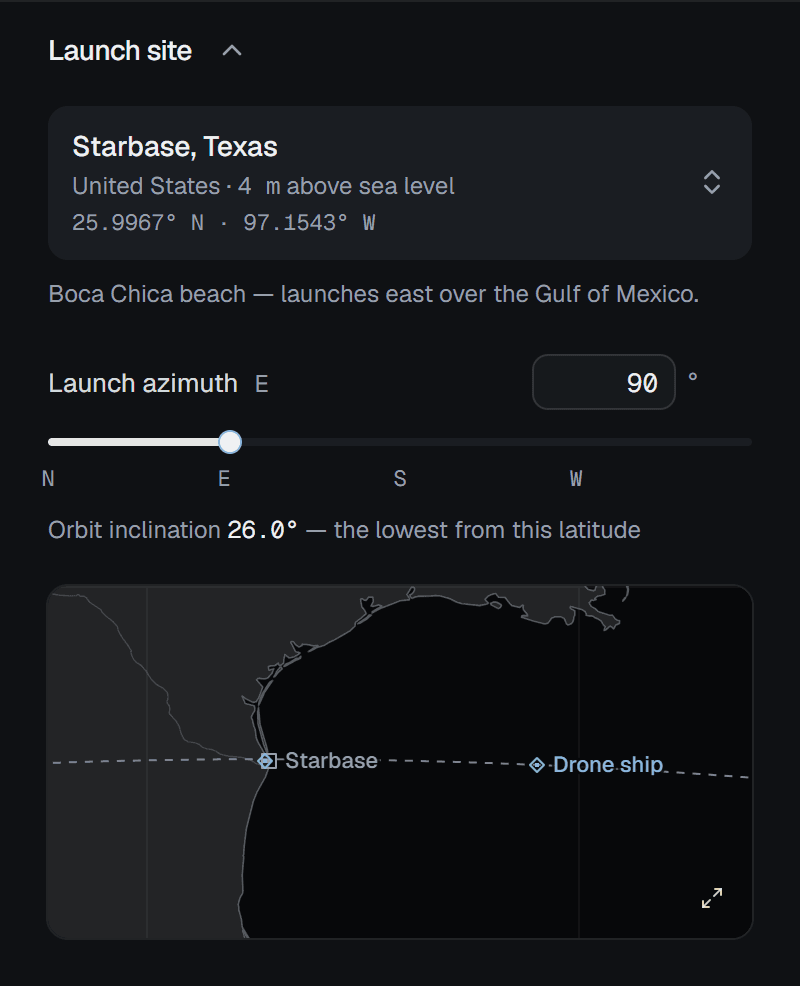
- 1The site: click to change it.
- 2Launch azimuth — drag, type, or use the arrow keys in the box.
- 3The orbit inclination that azimuth gives from this latitude.
- 4Preview: the pad, the drone ship and the launch track.
- 5Open the large map.
The launch azimuth is the compass heading the vehicle flies from the pad, 0 to 359.9°, with the nearest compass point beside its label. The slider and the number box set the same value; in the box, the up and down arrows step one degree, ten with Shift. Under it the panel works out the orbit inclination that heading reaches from the site's latitude and says so when it is the lowest the site can reach, or when the orbit is retrograde, against the Earth's spin. If you move a preset's azimuth, a Usual 90° button — or whatever the site's usual heading is — puts it back. The launch windows section of missions explains why a site cannot reach an inclination lower than its latitude.
The preview map draws the pad, Landing Zone 1, the drone ship's station and the great circle the azimuth launches along, on real coastlines. It is framed to show the coast around the pad, or tightly around the pad and the landing zone for a hop.
Landing: where each stage comes down
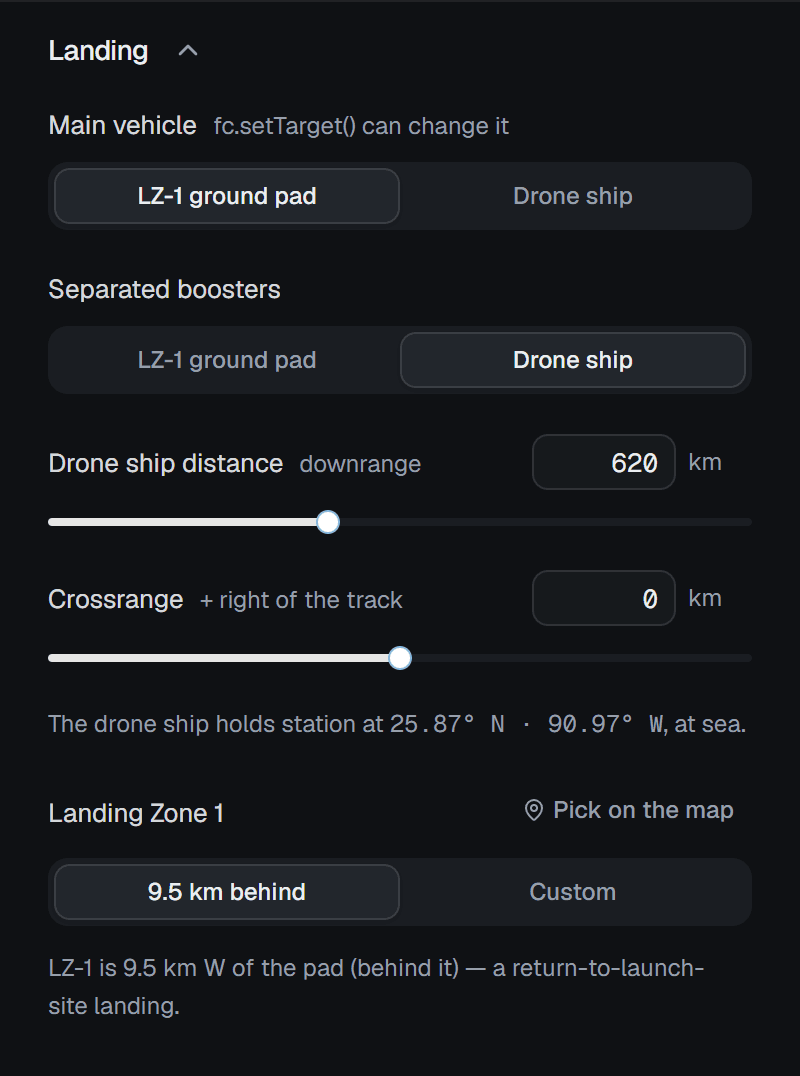
- 1Where the main vehicle lands. The program can change it in flight.
- 2Where separated boosters land.
- 3The drone ship's distance downrange.
- 4Its offset to the right of the track.
- 5Landing Zone 1: the site's own, 9.5 km behind, or custom.
- 6Place LZ-1 on the map.
There are two places to land: LZ-1, a ground pad near the launch site, and
the drone ship out at sea. The main vehicle and any separated boosters each
get one. The program can move the main vehicle's target during the flight with
fc.setTarget(); the reference lists it.
- A Return to site profile always brings the booster to LZ-1, so the booster choice is locked.
- The Hop profile has no staging and always lands on LZ-1; the section shrinks to one line and the landing zone.
- For a flight to the Moon or Mars the section is titled Booster landing and its summary follows the booster, the one stage that comes home.
The drone ship holds station 50 to 1 500 km downrange — 620 km by default — and up to 200 km either side of the track, positive to the right. The line under the fields gives its position and says whether it is at sea. If the station falls on land — an inland site, or an azimuth over a continent — the ship option is disabled, every landing moves to LZ-1, and a warning offers Move the ship to … the nearest sea along the track, if there is any within reach. Move the ship back to sea and its landings are restored.
Landing Zone 1 is the site's real landing zone where the preset has one, 9.5 km behind the pad along the reverse azimuth otherwise, or a custom point: a bearing and distance from the pad (0.5 to 50 km), or a point chosen with Pick on the map. The note says where it is and whether that is behind the pad; a zone that falls in the sea on the 3.5 km land mask gets a warning and a Move it onto land button. How a landing is flown and judged is in coming back down.
Destination and arrival
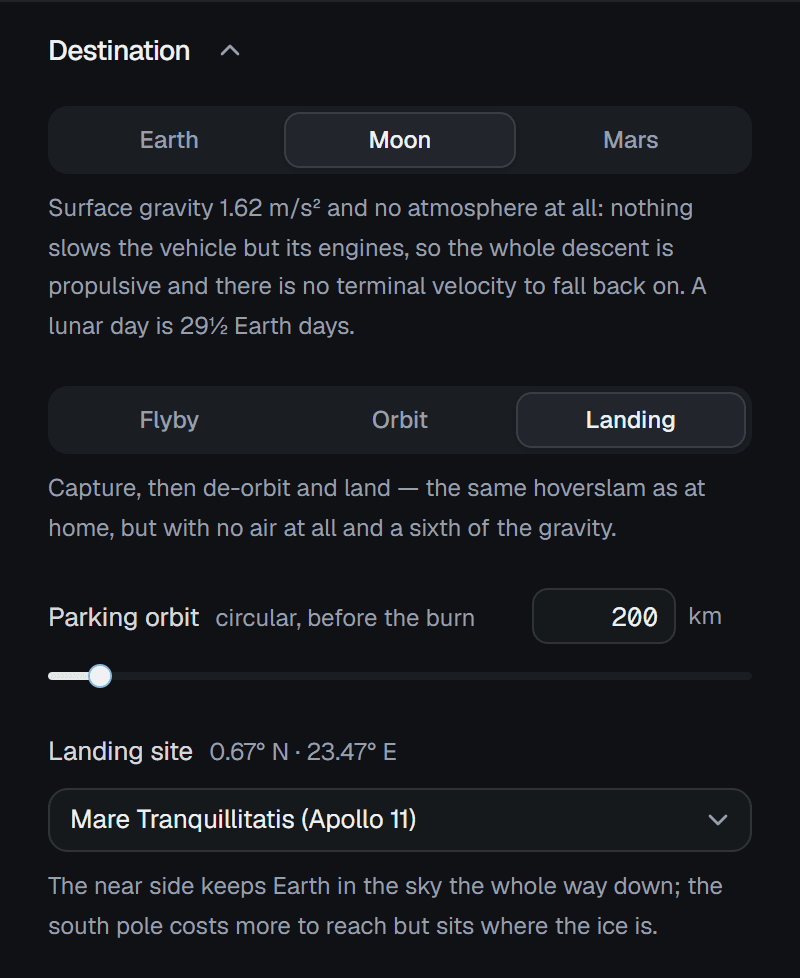
- 1Earth, the Moon or Mars.
- 2Arrival: flyby, orbit or landing.
- 3The circular parking orbit before the injection burn.
- 4For a landing: where on the body.
Earth keeps the flight in the Earth system: orbit, return to site or a hop, as set in the Profile section. Choose the Moon or Mars and the section grows:
- Arrival — Flyby (no arrival burn), Orbit (a capture burn at periapsis) or Landing (capture, de-orbit and a powered descent). A note under each says what it asks of the vehicle.
- Parking orbit — the circular orbit the vehicle waits in before the injection burn, 150 to 1 000 km in 10 km steps, 200 km by default.
- Landing site, for a landing — five places on the Moon (Mare Tranquillitatis, Oceanus Procellarum, Hadley–Apennine, Mare Crisium and Shackleton's rim at the south pole) and six on Mars (Jezero, Gale, Elysium Planitia, Chryse and Utopia Planitia, and Amazonis Planitia).
Leaving Earth fixes some things. The profile becomes orbital and the Profile section disappears; both landings go to LZ-1 unless you move the booster's; and the Launch time section disappears, because the launch window now decides when the flight leaves. Changing the destination, the arrival or the parking orbit clears the chosen window. The mission itself — arrivals, transfers, cruise and capture — is described in missions and destinations.
Launch windows
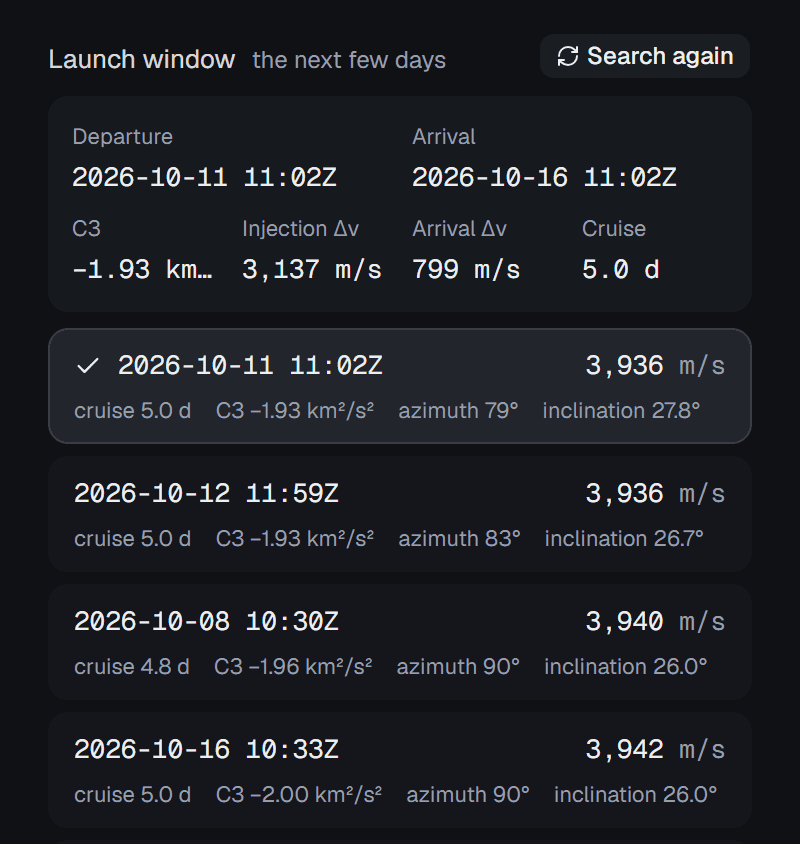
- 1Find windows (Search again once a list is shown).
- 2The chosen window: departure, arrival, C3, the two burns, the cruise.
- 3The chosen row, ticked.
- 4Another candidate: departure (UTC) and total Δv, then cruise, C3, azimuth and inclination.
Find windows runs the planner from today's date for this site, this destination, this arrival and this parking orbit: tens of milliseconds for the Moon, a second or two for Mars, with Solving Lambert transfers over the search range… while it works. The answer is a list sorted by total Δv — what the vehicle must supply after reaching the parking orbit — and each row gives the departure time in UTC, that Δv, the cruise time, C3 (the departure energy), and the azimuth and parking-orbit inclination the window needs. A window the site cannot reach stays in the list, greyed out, with the reason. The Moon's windows come most days; Mars's come in seasons about 26 months apart.
Click a row to fly it; click it again to clear it. Choosing a window:
- sets the launch instant to the window's best moment,
- sets the launch azimuth in the Launch site section to the window's,
- sets the parking orbit to the one the window was solved for,
- and freezes the plan into the mission, where the program reads it as
fc.plan.
The chosen window's figures sit above the list — departure, arrival, C3, injection Δv, arrival Δv and cruise — and the launch-readiness card over the flight view repeats the essentials, for example the Moon flyby · 2026-10-24 08:40Z · 3127 m/s after orbit. With no window chosen, the Destination summary ends in · no window. How the planner finds windows, and what it does not model, is in missions and destinations.
For a Moon or Mars flight, keep the weather on Random or Custom. Live weather is the weather at the pad now, and choosing it sets the launch instant to the forecast's hour, which is not the window's. That is why the destination demos load with random weather.
Weather
Three kinds of weather, chosen at the top of the section: Live, Random and Custom. Where the numbers come from and what they do to the vehicle is the subject of weather and launch conditions; this is what the panel shows.
The seed
Under the mode switch sits the seed: the number every random part of the flight is drawn from — gusts, hardware dispersions, failures, and in Random mode the weather itself. The hint beside it lists what it drives in the current mode.
- Unlocked (the default), a new seed is rolled at every launch.
- Locked, with the padlock button, every launch replays the same seed — and in Live mode the same weather snapshot, held until you ask for a newer one. Lock it to replay a flight exactly, or to compare two programs under the same conditions.
- The dice button rolls a new seed now; you can also type one.
The command palette has Lock the weather seed too, and a flight that went wrong in a Monte-Carlo batch can be replayed from its own seed (below).
Live weather
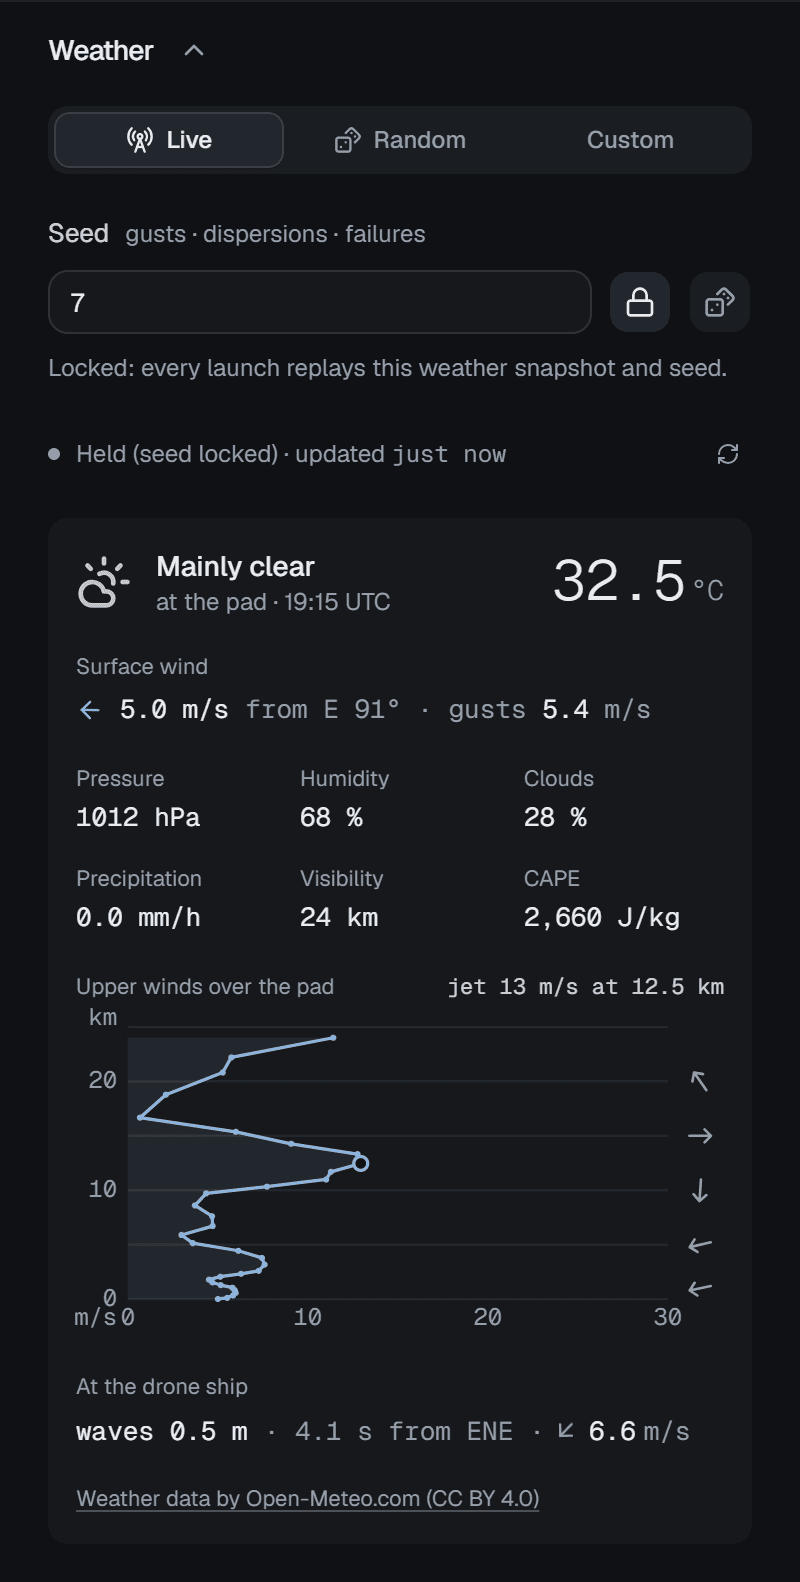
- 1Live, Random or Custom.
- 2The seed.
- 3Lock it: every launch replays this seed and snapshot.
- 4Roll a new seed now.
- 5Live or held, how old the snapshot is, and Refresh.
- 6Conditions at the pad at the snapshot's time.
- 7Wind speed against height over the pad; the circle is the jet stream.
- 8The sea and the wind at the drone ship.
Live downloads the current weather from Open-Meteo for the pad, Landing Zone 1, a point along the track and the drone ship's station, and refreshes it every ten minutes. The status line says whether the mission follows each new download (a green dot, Live) or holds the one it has because the seed is locked (a grey dot, Held), and how long ago it was fetched; the refresh button fetches at once. While a flight is in the air new downloads wait until the vehicle is back on the pad. With the seed locked, a newer download is offered rather than applied: Newer weather is available, with Use the latest.
The card gives the conditions at the pad at the snapshot's time — the weather in words, the temperature, the surface wind with an arrow, its direction and its gusts, then pressure, humidity, cloud cover, precipitation, visibility and CAPE. The chart below plots wind speed against height up to 25 km: a circle marks the jet stream, named above the chart, and the arrows on the right point where the wind blows at 1, 5, 10, 15 and 20 km. When the scale reaches it, a dashed line marks 50 m/s, where the upper-level wind rule turns marginal. The last line is the sea at the drone ship: wave height, period and direction, and the wind there.
If Open-Meteo cannot be reached, the section says so — Live weather is unavailable — with Try again and Use random weather, and meanwhile shows the random weather the flight will fly instead. Live weather needs a real site: on the classic range the Live option is disabled. Move the pad more than 5 km and the snapshot is dropped rather than shown for the wrong place.
The go/no-go board
Under the card, the snapshot is graded against launch-weather rules modelled on real range practice.
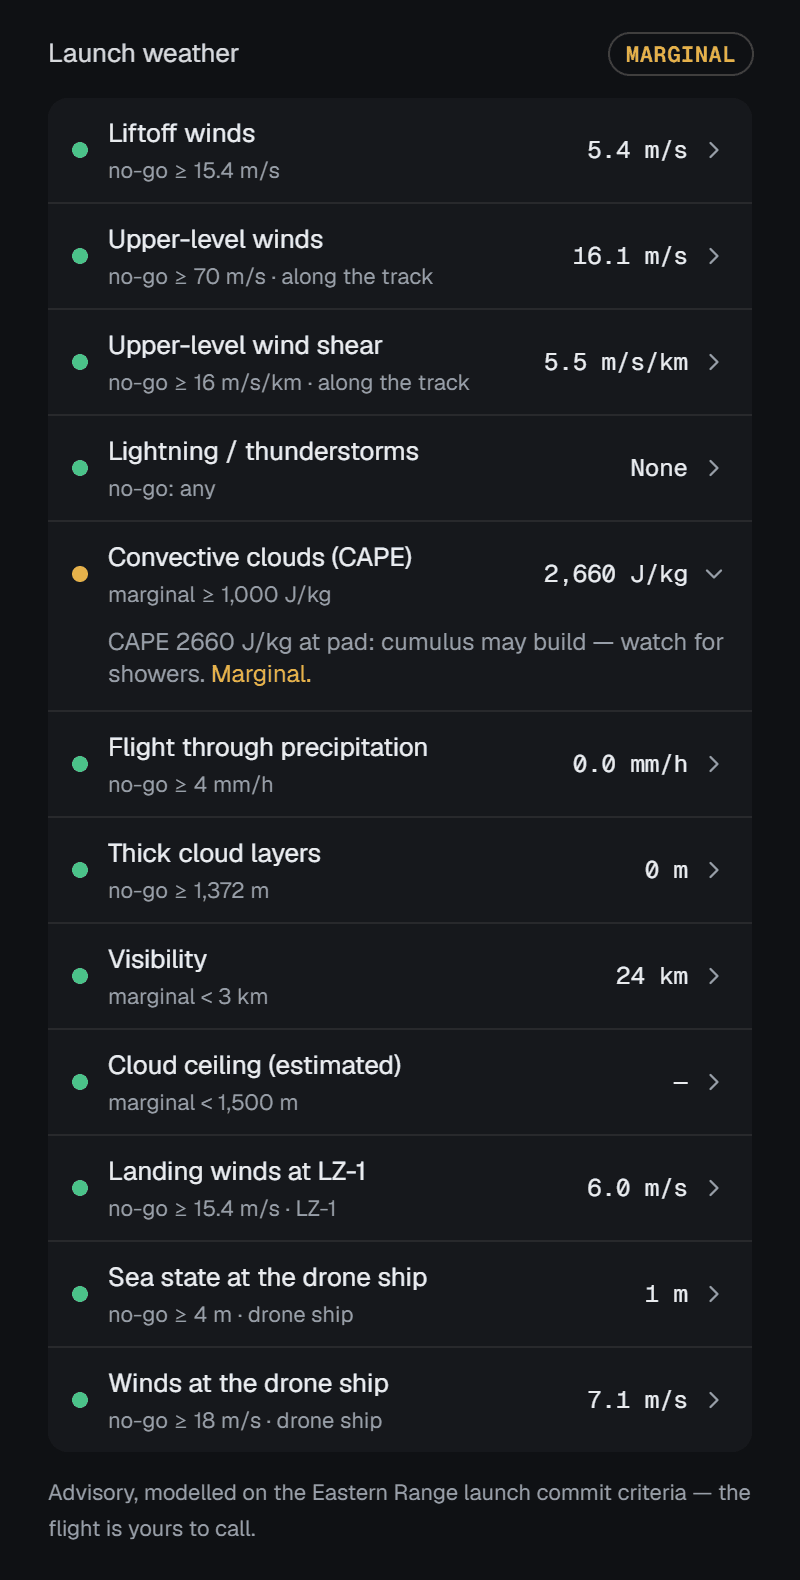
- 1The verdict: the worst of the rules.
- 2A rule and the threshold it is judged against.
- 3The value measured in the snapshot.
- 4Where it was measured, when it is not at the pad.
- 5An opened row: the forecaster's sentence.
Each row is one rule — liftoff winds, upper-level winds and shear, lightning, convective cloud, precipitation, thick cloud, visibility, the cloud ceiling, and the winds and sea where the stages land — with a dot for its status: green for go, amber for marginal, red for no-go, grey when the snapshot has no data for it. The pill in the corner is the worst of them. Click a row to read the sentence behind it: where, how much, and the status. The thresholds are tabulated in weather and launch conditions.
The board only advises. It never stops a launch, and the rules about the landing sites only appear for the platforms the mission actually uses. The same minute of weather reads differently across the presets:
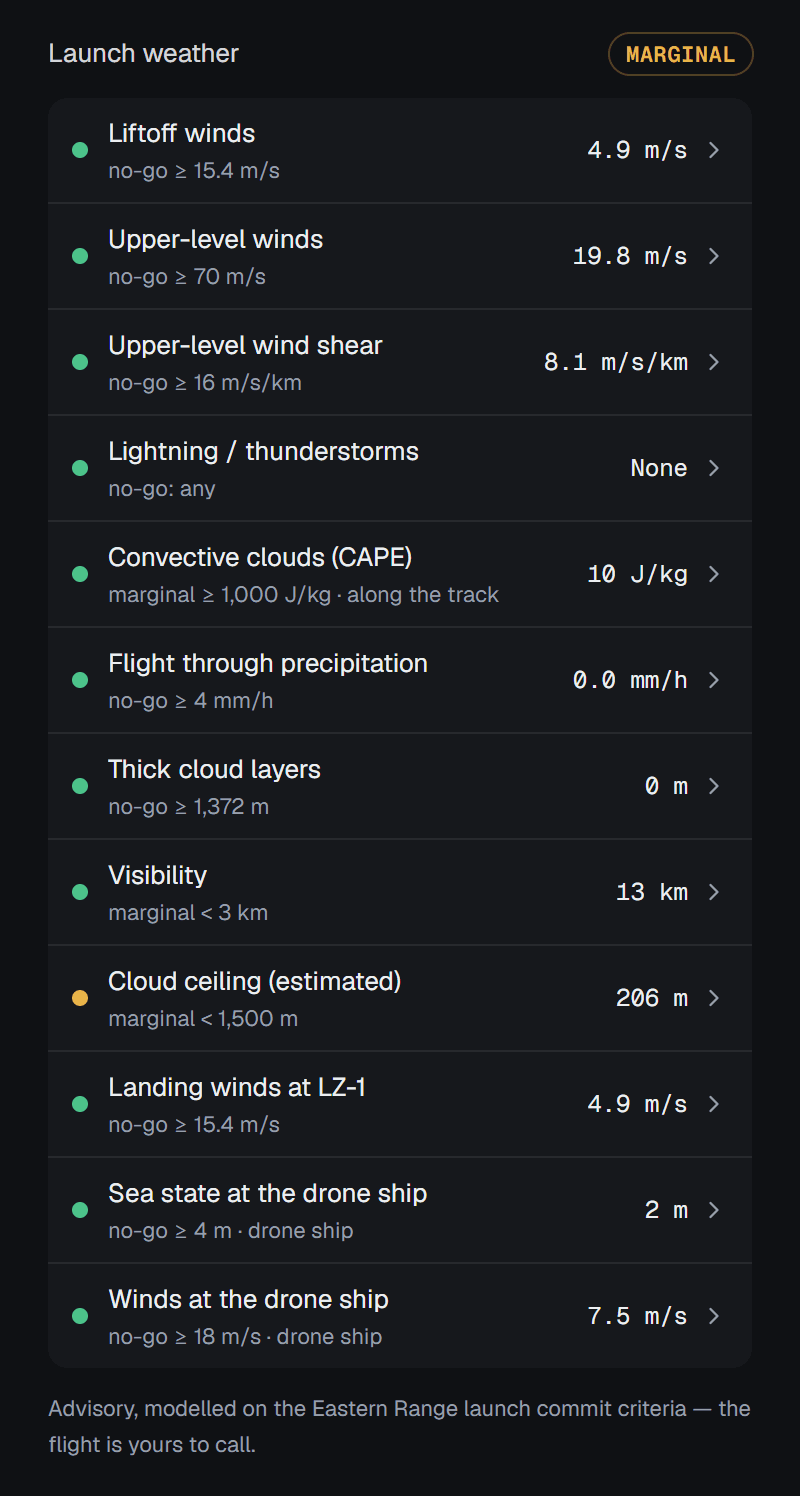
Vandenberg — marginal
A marine-layer ceiling of 206 m.
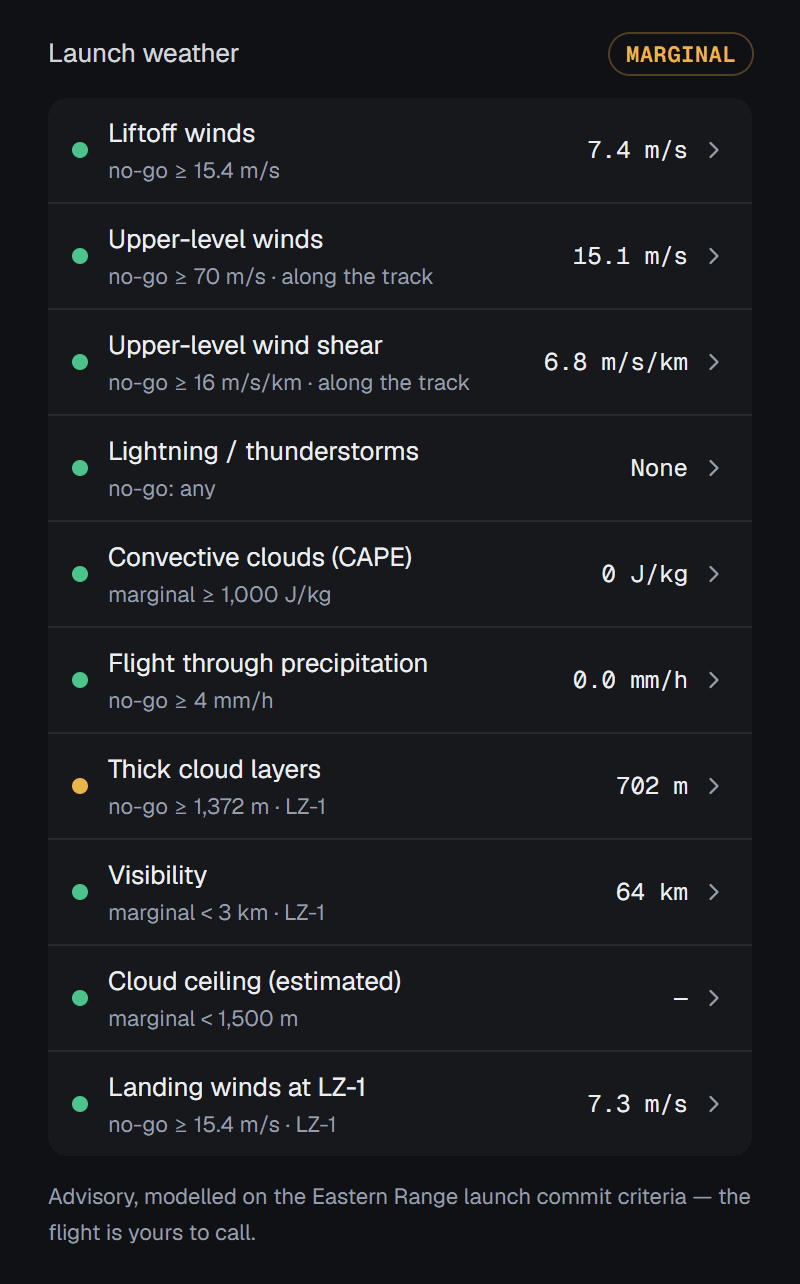
Baikonur — marginal
A 702 m cloud layer in the freezing band over LZ-1.
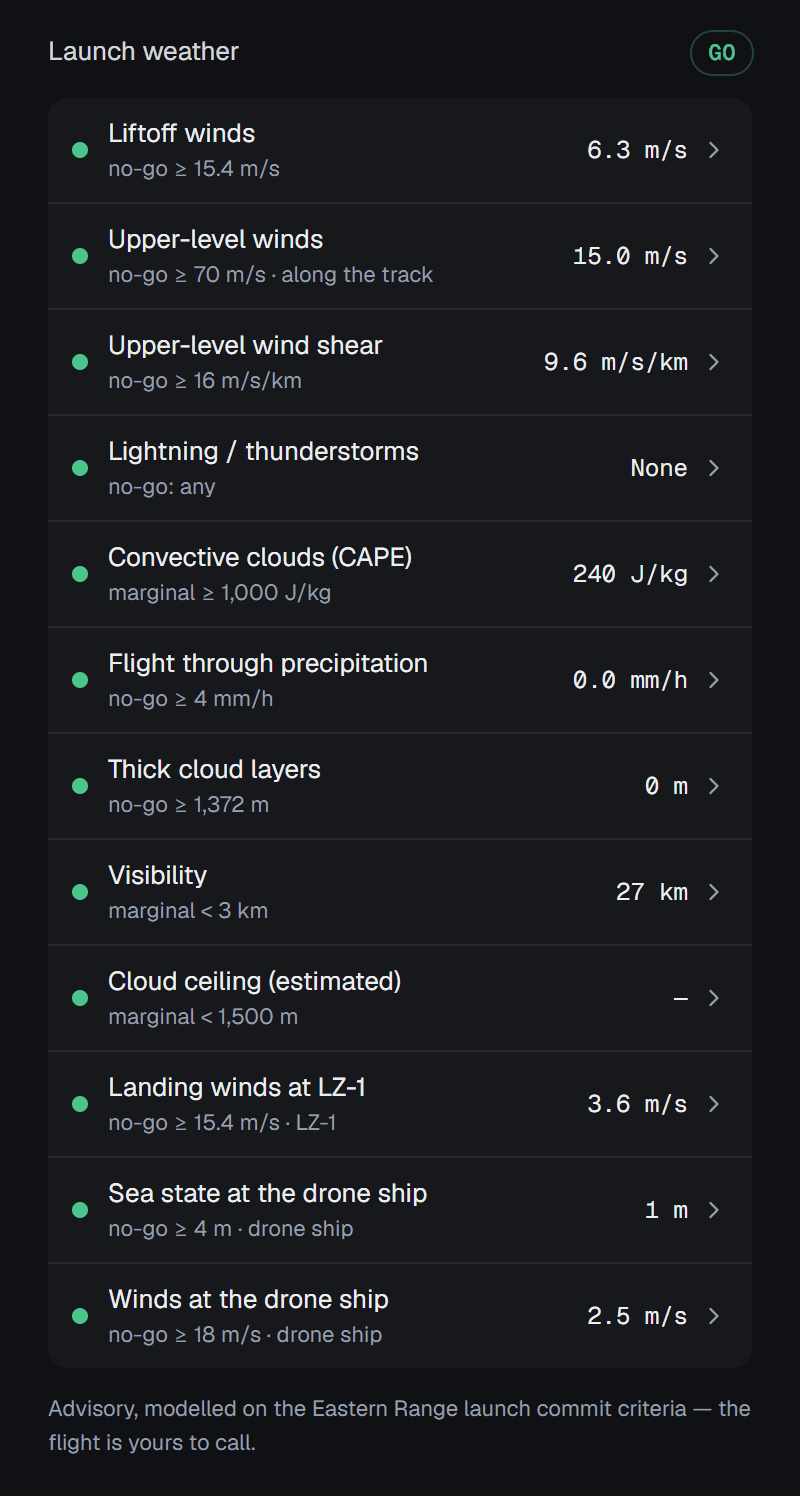
Tanegashima — go
Every rule within its limit.
Random and custom weather
Random rolls the launch-day weather from the seed, following the site's latitude and the season. The section shows the Forecast for this seed — wind speed and direction, gusts, turbulence, sea state, temperature, and the jet stream's speed and height. With the seed unlocked the forecast is dimmed and marked only used if you lock it, because the launch will roll a new seed.
Custom sets every parameter by hand: surface wind (0 to 15 m/s) and where it blows from, gusts and turbulence as percentages, a sea state from 0 (calm) to 3 (rough), the temperature (−30 to 45 °C), and the jet stream's speed (up to 70 m/s) and direction. On the classic range the wind is a single signed east–west value, positive when it blows east. Neither mode has a board: the rules are written for measured weather.
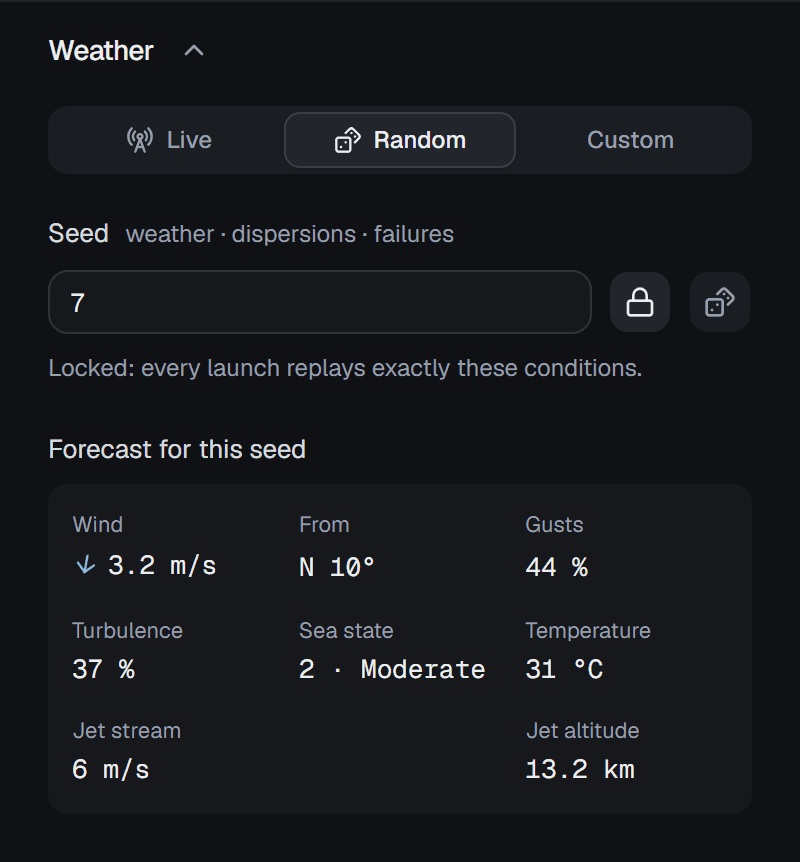
Random
The forecast rolled from seed 7.
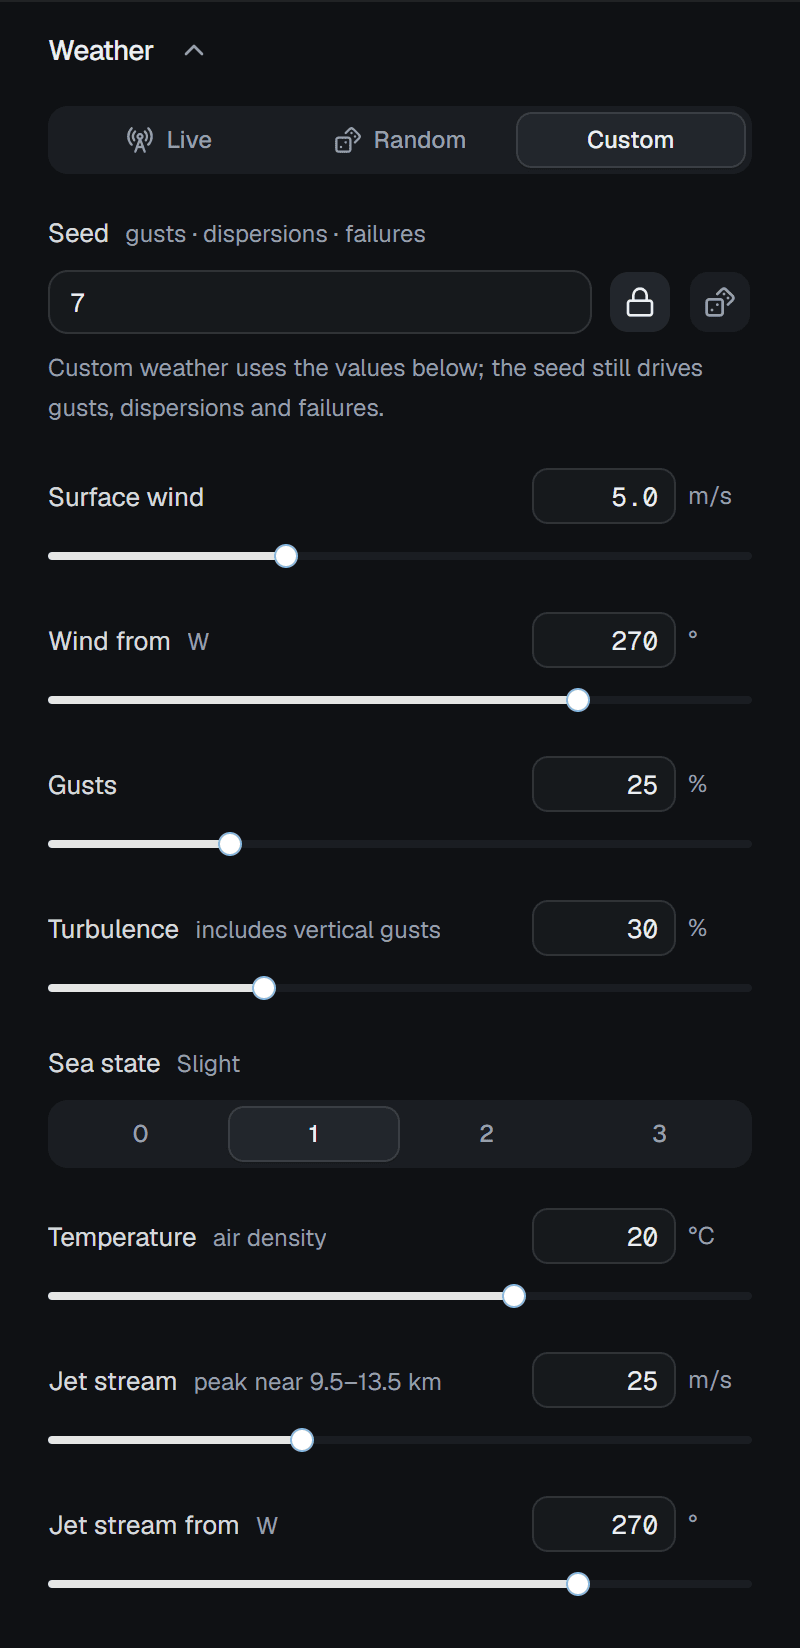
Custom
Every parameter by hand.
The rest of the panel
- Profile (Earth only) — Orbital, Return to site or Hop, with a line describing each. The hop adds its apex objective, the Hop altitude, 1 to 50 km.
- Launch time (Earth only) — Set the time, the local solar time at the pad on a 24-hour slider marked night, dawn, noon and dusk, or Random daylight, a time between 05:00 and 19:00 drawn from the seed. With live weather there is nothing to set: the flight launches at the live snapshot's instant, and the section shows it with the local solar time it means at the pad. Either way the sun in the sky is where it would be at that time.
- Failures & sensors — Hardware dispersions scatters thrust, specific impulse, dry mass and drag like real hardware, from the seed. Failures is None, Random — may happen, from the seed (a multi-engine stage may lose an engine) or a specific failure to rehearse. Sensors decides what the program reads: Ideal is the true state, Realistic adds navigation and sensor noise and bias, Hard triples it. Anything but ideal puts a Sensors · realistic badge over the flight view.
- Objectives — what the flight will be scored on, with the landing limits; the flight report shows how it was scored.
Monte-Carlo: many flights at once
One good flight proves little. The Monte-Carlo section flies the current vehicle, program and mission again and again on new seeds, in the background, and tallies the results.
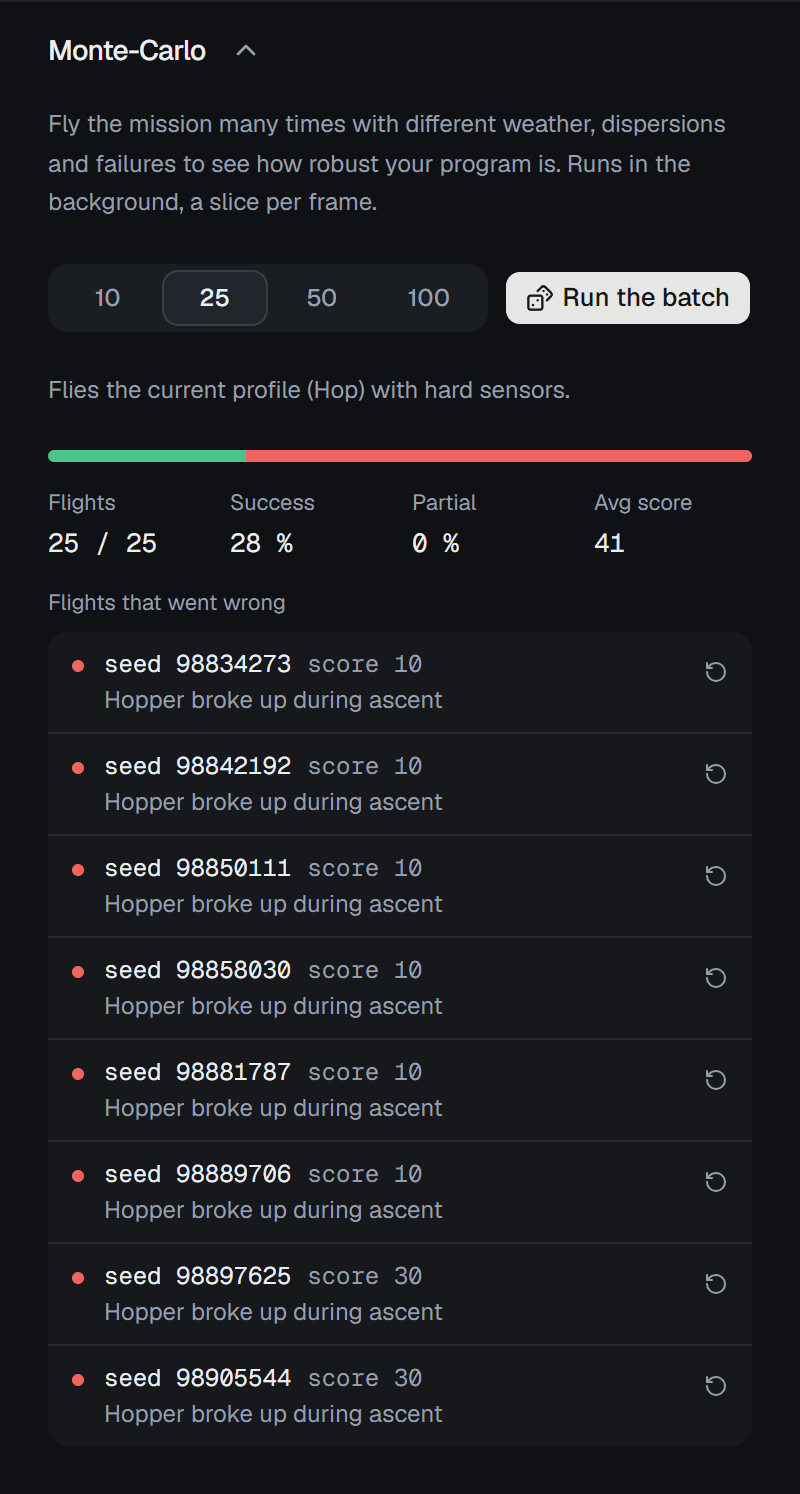
Pick 10, 25, 50 or 100 flights and Run the batch; Stop ends it early. The flights run a slice per frame, so the playground stays usable while they do. Each flight draws a new seed, so the weather (in Random mode), the gusts, the dispersions and any failures change from one to the next; with Live or Custom weather every flight flies the same weather and only the seed-driven parts vary. The note under the buttons says what is being flown.
The results fill in as flights finish: a bar of successes, partial successes and failures, then the count, the success and partial rates and the average score, a line on booster recovery when there are boosters, and the most recent eight flights that went wrong, each with its seed, its score and what went wrong. The replay button on a row locks that seed into the mission — Seed … locked — Launch to replay this flight — so the next launch flies that exact flight again.